Setup a High Content Screening Imaging Platform with Label Studio
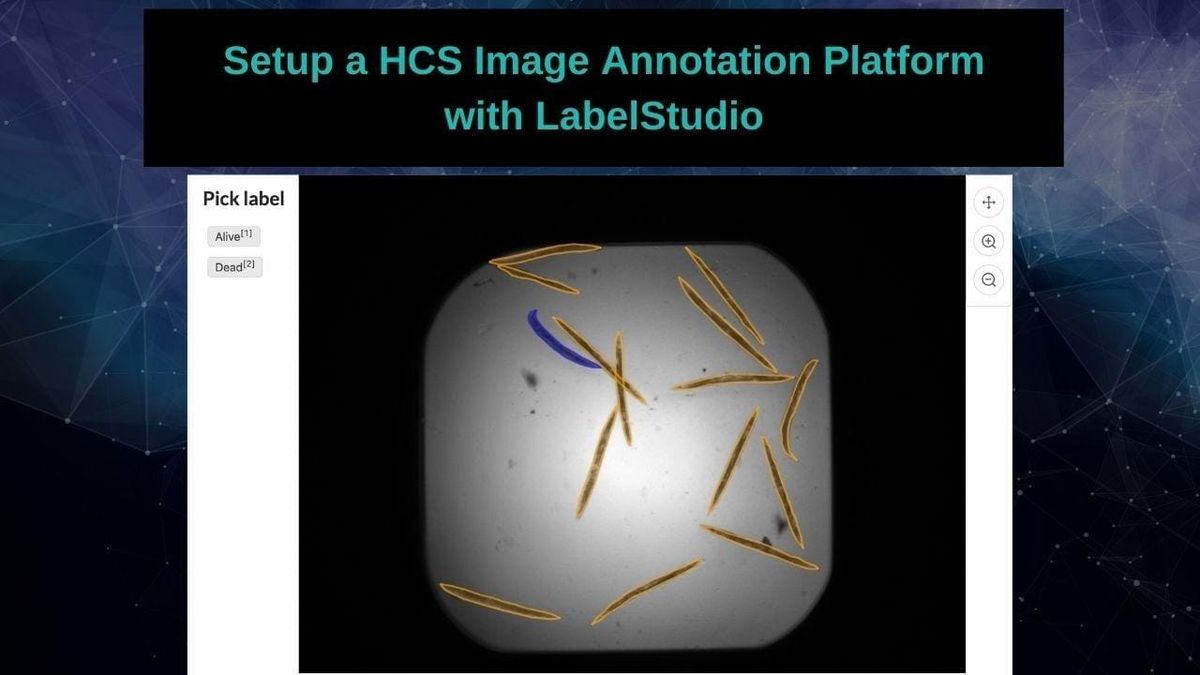
For a few years now I have been on a quest to find a tool I really like for annotating HCS images using a web interface. I've used several tools, including a desktop application called LabelImg, and I have finally found a tool that checks all the boxes called LabelStudio!
Label Studio is an annotation tool for images, audio, and text. Here we'll be concentrating on images as our medium of choice.
I go through the process in this video.
Grab the data
You can, of course, use your own data, but for this tutorial I will be using a publically available C. elegans dataset from the Broad BioImage Benchmark Collection.
mkdir data
cd data
wget https://data.broadinstitute.org/bbbc/BBBC010/BBBC010_v2_images.zip
unzip BBBC010_v2_images.zip
HCS images are often very dark when opened in a system viewer. To use them for the rest of the pipeline we will have to do a two step conversion process, first using bftools to convert from tif -> png, and then using Imagmagick to do a levels correction.
cd .. # be in your project root here
# Use the bftools docker image and drop into a shell
mkdir data/tif
mkdir data/png
mkdir data/corrected-png
docker run -it -v $(pwd)/data:/home/bf/data openmicroscopy/bftools bash
cd /home/bf/data
find $(pwd) -name '*tif' | sed 's/\.tif//g' | xargs -I {} bfconvert -nogroup {}.tif {}.png
# ctrl+d to exit the container
Now we'll use ImageMagick to apply an autolevel correction so we can see what we're labelling!
docker run -it --rm -v $(pwd)/data:/data \
    continuumio/miniconda3 bash
# On the image
conda install -c conda-forge -y imagemagick
cd /data
find $(pwd) -name '*tif' | xargs -I {} basename {} | sed 's/\.tif//g' | xargs -I {} convert -auto-level /data/{}.png /data/{}-autolevel.png
mv *.tif tif/
mv *auto*.png corrected-png/
mv *.png png/
# Ctrl+D to exit
If you're like me and you collect docker images as a way to avoid installing stuff on your computer you'll need to clean them out on occasion.
# This will remove ALL DOCKER containers from your system
# Use with caution!
docker container stop $(docker container ls -aq)
docker system prune -f -a
If you need to clean up the images remove the data/png and data/tif folders. We won't be using them.
Startup up LabelStudio
LabelStudio works based on projects, and each project is compromised of tasks. In this case a task is labelling an image. So what we need to do is to point it at a directory of images, and it will configure the project for us.
Different Labelling Configurations
LabelStudio can accomodate several different image annotation types. The best place to go to learn more about this is to go to their templates page and start exploring with their playground.
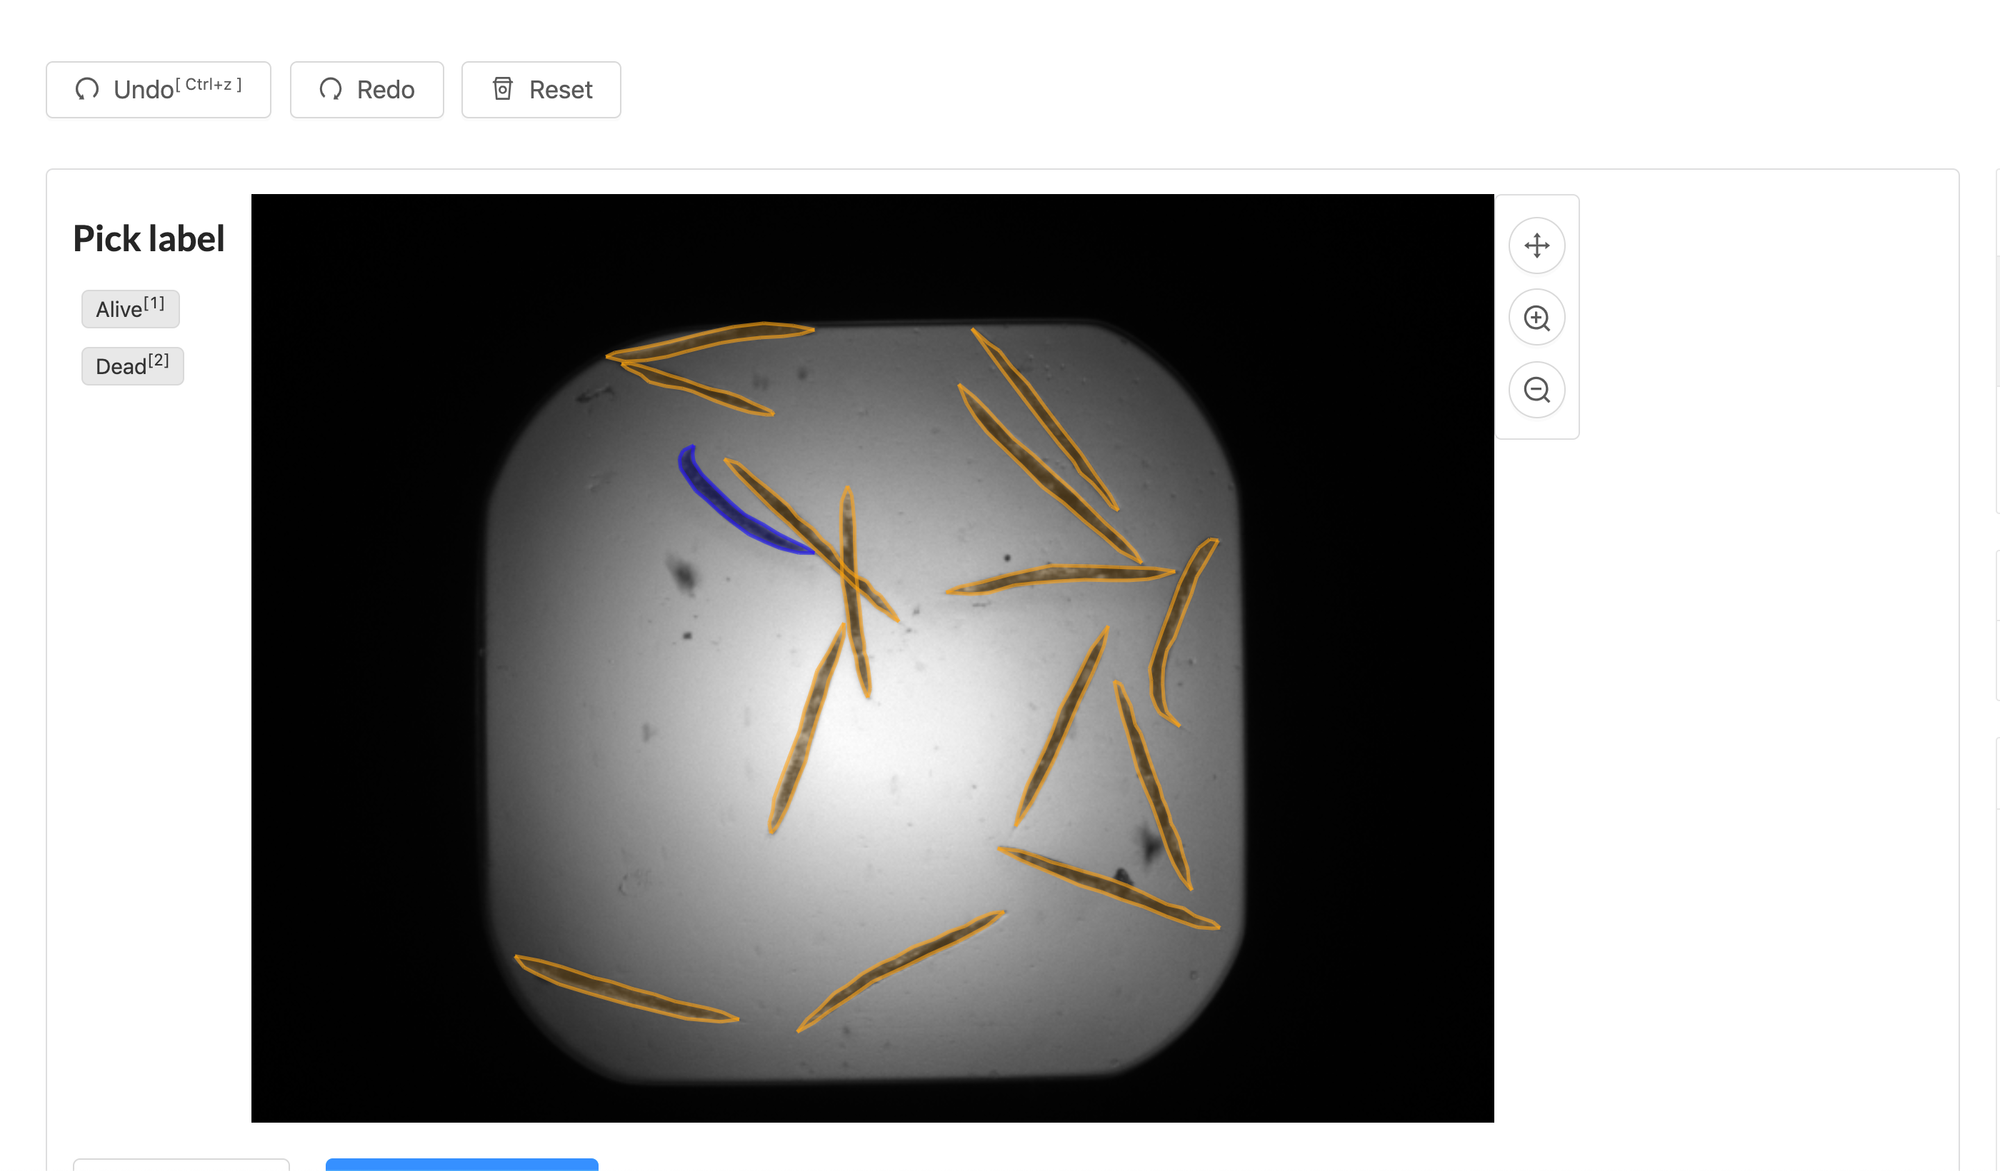
I'm going to assume that you are using the Semantic Segmentation, Polygon Labelling, or Bounding Boxes. As a quick disclaimer the semantic segmentation interface was a bit glitchy when I tried it out. At the time of writing it's marked as 'New' and under active development. Probably by the time you read this it will be sorted out.
This wasn't a problem for me because I personally found that I could get the same functionality using the Polygon Labelling tool to outline the shape. I also found the polygon tool easier to use, and once you have the polygon outline you can convert that into a mask.
Semantic Segmentation vs Bounding Boxes
Semantic segmentation is when you assign each of the pixels in your image as being the thing you want to label of not. It is more time consuming to label, and you need more significant computational resources in order to train your models, but you will have greater accuracy.
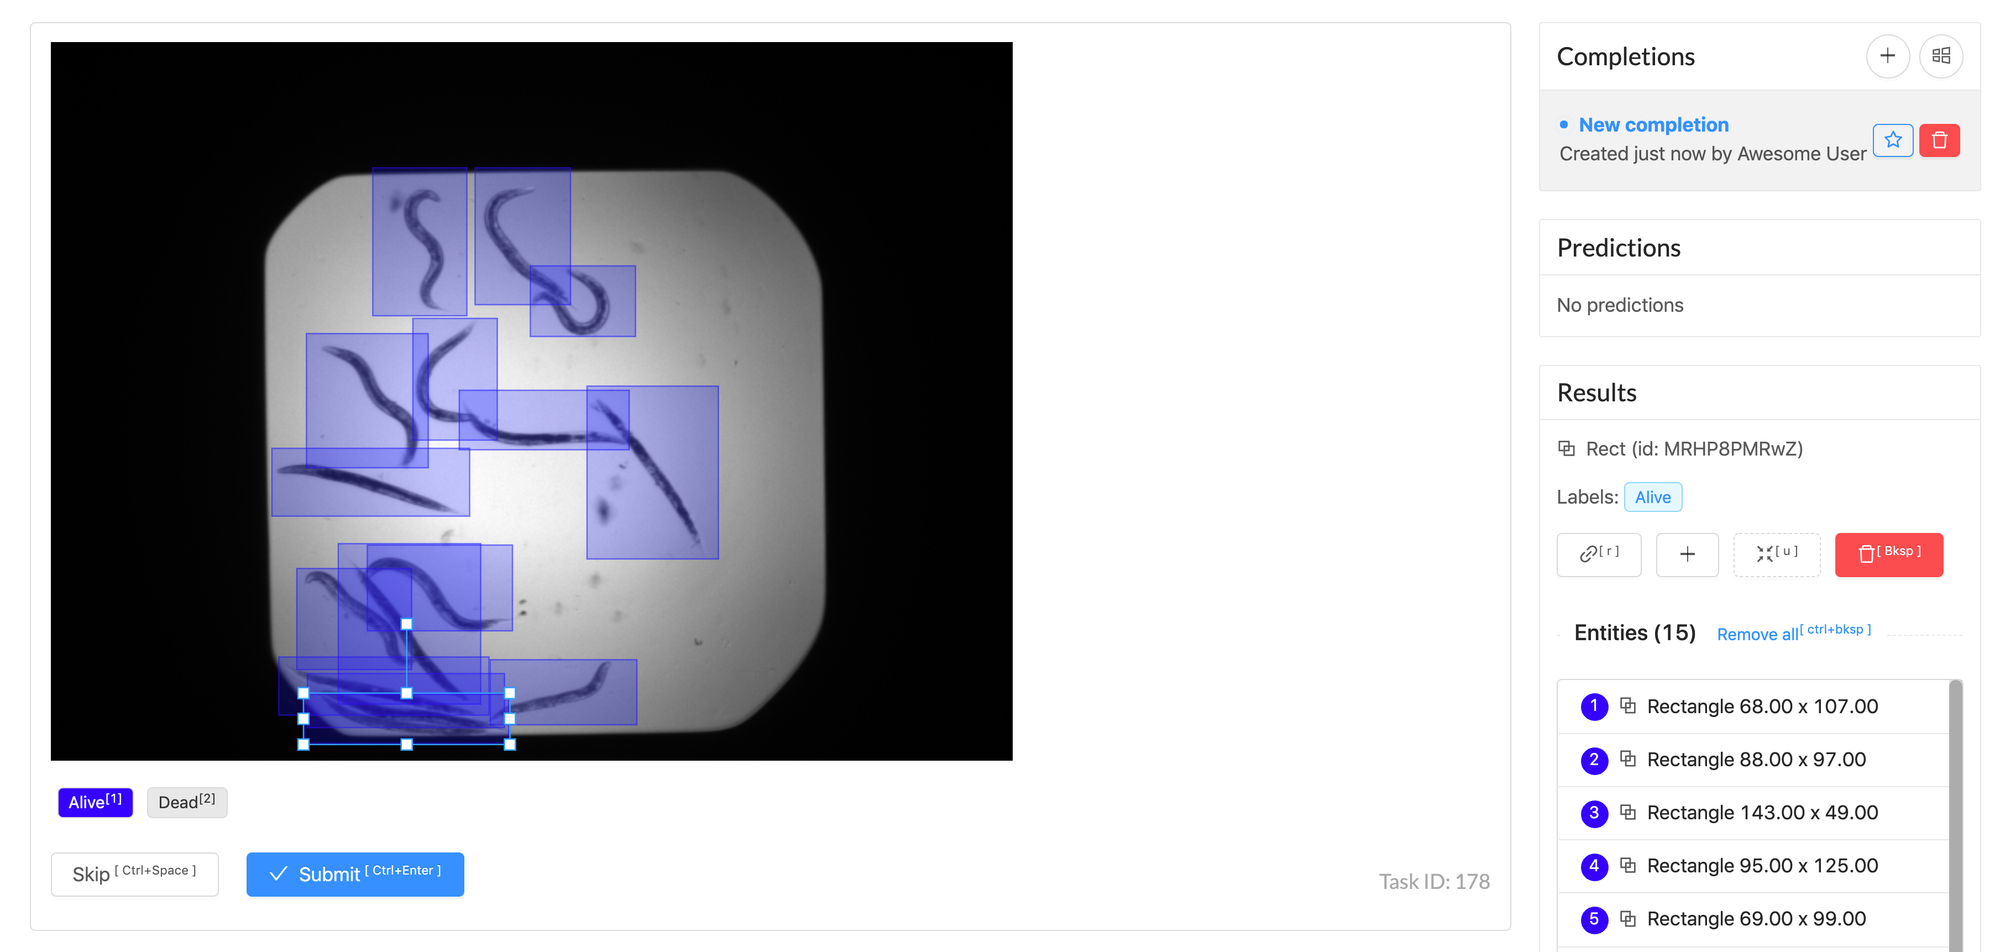
Using a bounding box is quite a bit faster to label and get started with, but you lose accuracy, particularly when you have lots of overlapping objects.
This is better explained with examples:
Polygon Labels
Semantic Labels
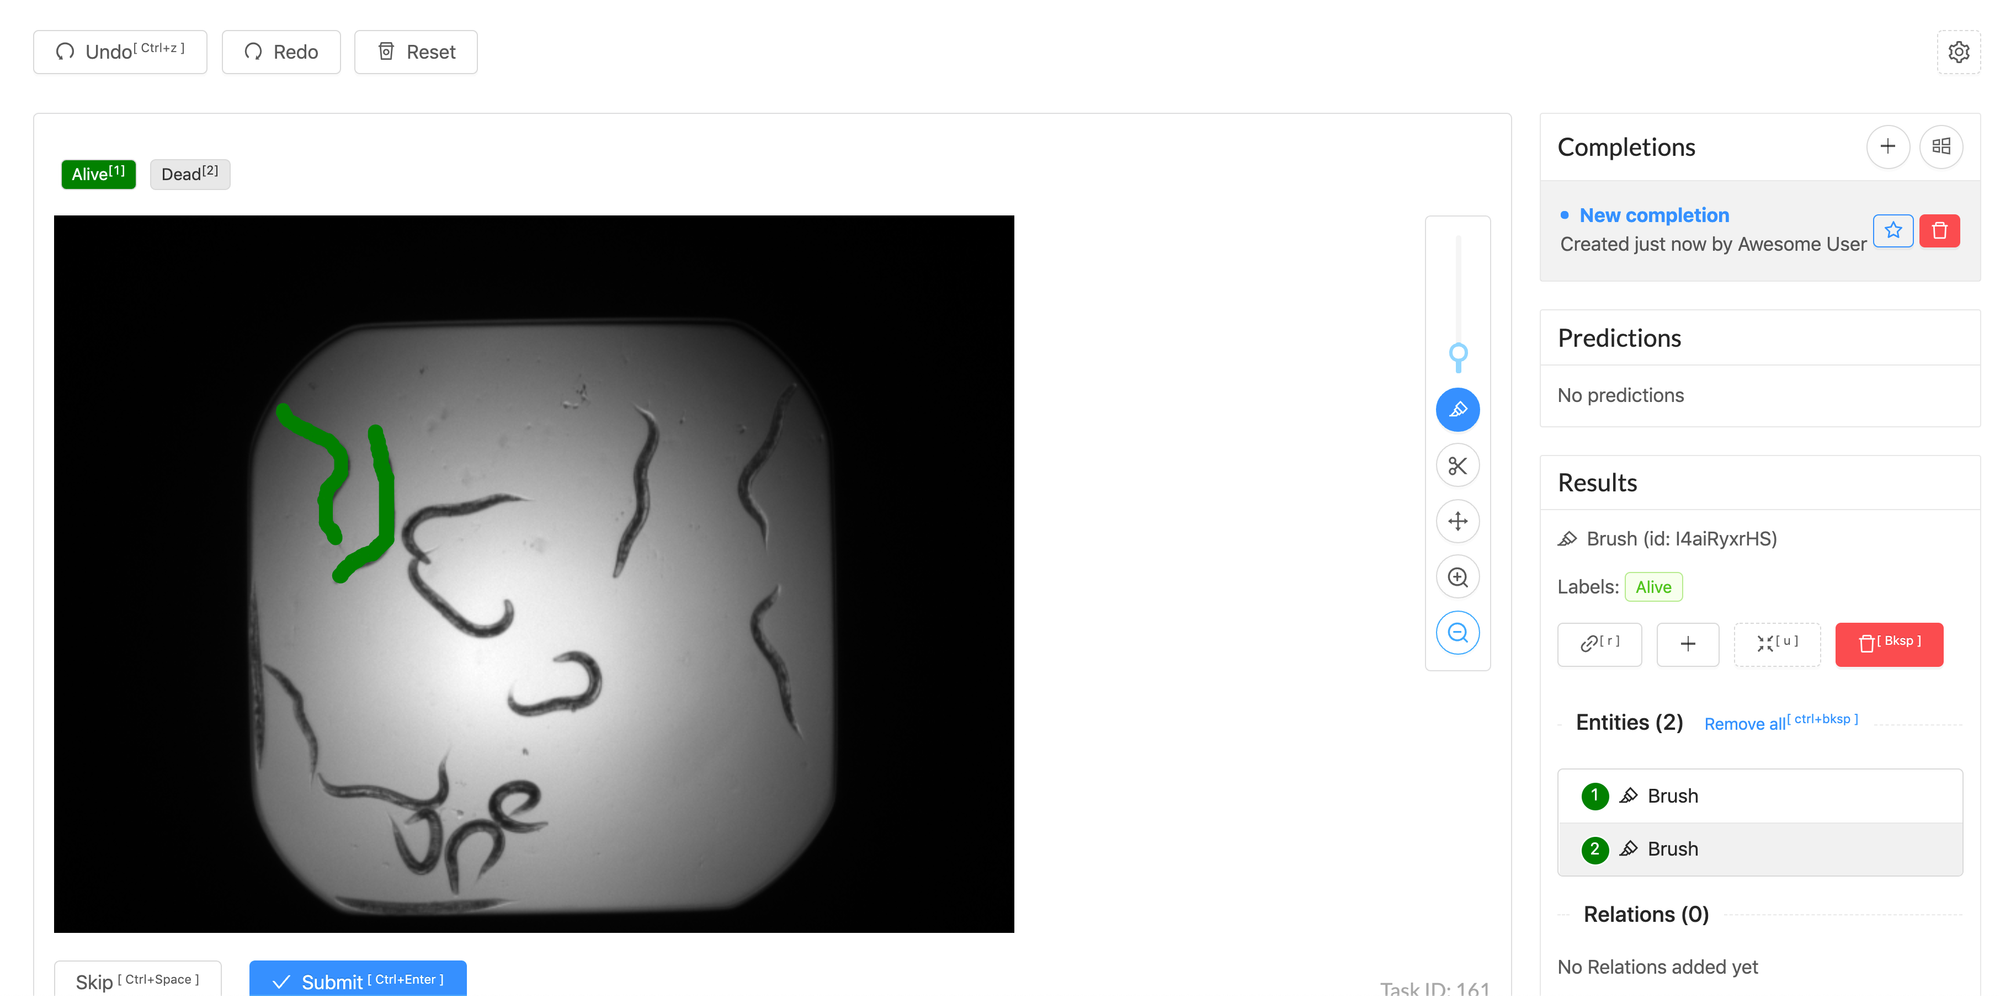
Bounding Boxes
Initialize and Start Script
Grab this and name it init-labelproject.sh.
#!/usr/bin/env bash

# init-labelproject.sh

docker run --rm -it \
    -e PORT=${PORT} \
    -v $(pwd)/${TYPE}:/label-studio/${TYPE} \
    -v $(pwd)/data:/label-studio/data \
    -v $(pwd)/conf:/label-studio/conf \
     --name label-studio-${TYPE} \
     heartexlabs/label-studio:latest label-studio \
        init ${TYPE} --force \
        --port ${PORT} \
        --input-path=/label-studio/data/corrected-png \
        --label-config=/label-studio/conf/${TYPE}-config.xml \
        --input-format=image-dir
Grab this and name it run-labelstudio.sh.
#!/usr/bin/env bash

# run-labelstudio.sh

docker run --rm -it \
    -p ${PORT}:${PORT} \
    -e PORT=${PORT} \
    -v $(pwd)/${TYPE}:/label-studio/${TYPE} \
    -v $(pwd)/data:/label-studio/data \
    -v $(pwd)/conf:/label-studio/conf \
     --name label-studio-${TYPE} \
     heartexlabs/label-studio:latest label-studio \
        start ./${TYPE} --port ${PORT}
Once you have these run chmod 777 *sh and let's label some worms!
Setup your project and Start up the Web Interface
Grab your desired configured below and start up the web interface.
mkdir conf
# Make sure each of the xml files are in the conf dir!
cd conf
Bounding Box Configuration
Grab this and place it in conf/object-config.xml.
<View style="display: flex">
  <View style="width: 100px">
    <Header value="Pick label" />
    <RectangleLabels name="tag" toName="img">
      <Label value="Alive" background="blue"></Label>
      <Label value="Dead" background="orange"></Label>
    </RectangleLabels>
    </View>
  <View>
    <Image name="img" value="$image" showMousePos="true" zoom="true" zoomControl="true" />
  </View>
</View>
Polygon Configuration
Grab this and place it in conf/polygon-config.xml.
<View style="display: flex">
  <View style="width: 100px">
    <Header value="Pick label" />
    <PolygonLabels name="tag" toName="img" strokewidth="2" pointstyle="circle" pointsize="small" showInline="false">
      <Label value="Alive" background="blue"></Label>
      <Label value="Dead" background="orange"></Label>
    </PolygonLabels>
    </View>
  <View>
    <Image name="img" value="$image" showMousePos="true" zoom="true" zoomControl="true" />
  </View>
</View>
Semantic Configuration
Grab this and place it in conf/semantic-config.xml.
<View style="display: flex">
  <View style="width: 100px">
    <Header value="Pick label" />
    <BrushLabels name="tag" toName="img">
      <Label value="Alive" background="blue" />
      <Label value="Dead" background="orange" />
    </BrushLabels>
    </View>
  <View>
    <Image name="img" value="$image" showMousePos="true" zoom="true" zoomControl="true" />
  </View>
</View>
Bounding Box
To run the bounding box interface use these commands -
export TYPE="object"
export PORT="8080"
mkdir $TYPE
# you only need to run the init script once for setup
./init-labelproject.sh
./run-labelstudio.sh
And open up localhost:8080 in your browser.
Polygon
To run the polygon interface use these commands -
export TYPE="polygon"
export PORT="8081"
mkdir $TYPE
# you only need to run the init script once for setup
./init-labelproject.sh
./run-labelstudio.sh
And open up localhost:8081 in your browser.
Semantic Segmentation (Brush)
To run the semantic interface use these commands -
export TYPE="semantic"
export PORT="8082"
mkdir $TYPE
# you only need to run the init script once for setup
./init-labelproject.sh
./run-labelstudio.sh
And open up localhost:8082 in your browser.
Customizing the Labelling Interface
LabelStudio gives you quite a bit of control over the labelling interface. You can also add simple forms directly through the configuration by using the Control Tags.
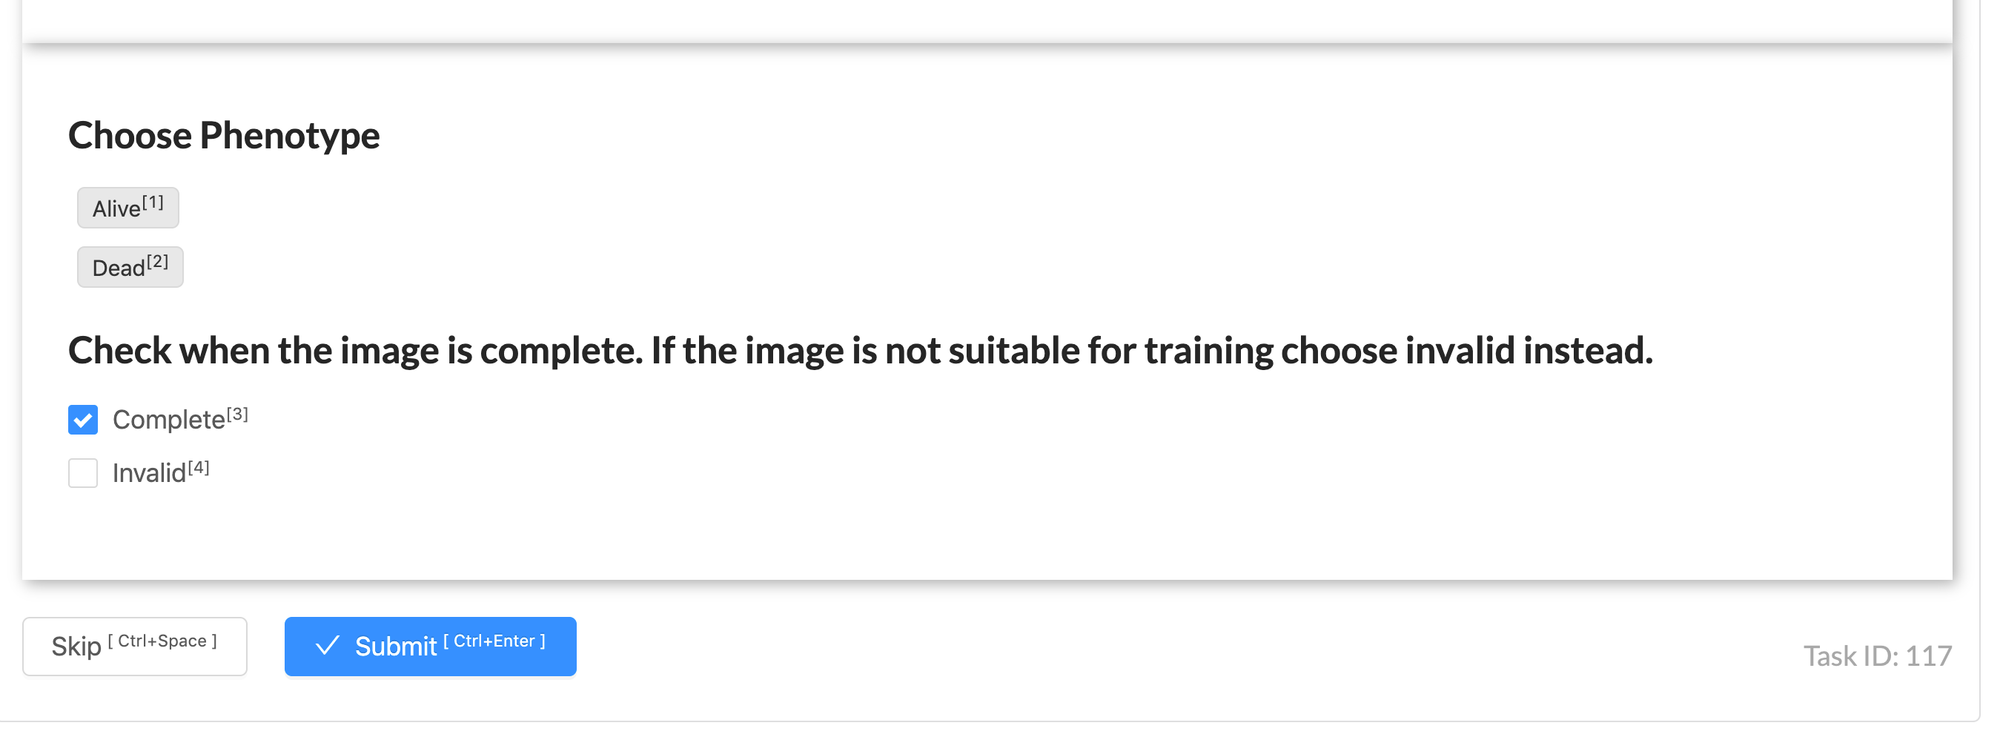
Something I wanted was to the ability to mark the image as complete, meaning all worms were marked, or invalid to exclude it from training. I was able to add this with the following configuration.
<View>

    <!--    Begin Display the image-->
    <View style="padding: 25px;
               box-shadow: 2px 2px 8px #AAA;">
        <Image name="img" value="$image" showMousePos="true" zoom="true" zoomControl="true"/>
    </View>
    <!--    End Display the image-->

    <!--    Begin display labels-->
    <View style=" padding: 25px;
               box-shadow: 2px 2px 8px #AAA;">
        <View style="">
            <Header value="Choose Phenotype"/>
            <PolygonLabels name="tag" toName="img" strokewidth="2" pointstyle="circle" pointsize="small"
                           showInline="false">
                <Label value="Alive" background="blue"></Label>
                <Label value="Dead" background="orange"></Label>
            </PolygonLabels>
        </View>

        <View style="">
            <Header value="Check when the image is complete. If the image is not suitable for training choose invalid instead."/>

            <Choices name="complete" toName="img" choice="single">
                <Choice alias="complete" value="Complete"/>
                <Choice alias="invalid" value="Invalid"/>
            </Choices>
        </View>
    </View>
    <!--    End display labels-->


</View>
You can play around with this quite a bit in order to get the exact layout you want. Width, height, and other CSS variables are all configurable through the configuration.
Each control has a name name, which must be unique, and a destination toName.
    <Choices name="complete" toName="img" choice="single">
    # ...
    <Image name="img" value="$image"
    # ...
    <PolygonLabels name="tag" toName="img"
Handling the Labelling Output
Each output will be in your project-dir/completions, and in that directory there will be one json file per image. You will see the path completions and then there will be an array of results. The output format and exact specs can change based on your configuration, so be sure to verify this with your own configurations.
Here is an example polygon label output. I've added comments and it's no longer valid json, so don't try to parse it. ;-)
{
## Corresponds to the name on the Polygon Control
    "from_name": "tag",
## Randomly generated ID
    "id": "bUgnJpbBgC",
## Height and Width of the Image
    "original_height": 520,
    "original_width": 696,
## Task Variable
    "source": "$image",
## The to portion of the control
    "to_name": "img",
## Control Type
    "type": "polygonlabels",
    "value": {
## Points of the polygon
## These can be read into a matplotlib.Path object for parsing
        "points": [
            [
                71.25434944790884,
                27.052753770458885
            ],
            [
                68.9321022931952,
                28.148466100859682
            ],
            ... More labels
        ],
        "polygonlabels": [
        ## ITS ALIVE!
        ## This is one of the phenotypes
        ## The phenotypes were either alive or dead
            "Alive"
        ]
    }
},
And here is an example of the 'form' we created with complete / invalid.
{
# This is the name from the control
    "from_name": "complete",
    "id": "PZru1lZMeo",
    "to_name": "img",
    "type": "choices",
    "value": {
        "choices": [
        ## This image as marked as invalid!
        ## Don't use it for training!
            "invalid"
        ]
    }
}
This is when things get really interesting, because now that you have a configurable interface with a parseable output you can start to create robust pipelines for training.
Further Ideas
When you spin up the interface and start labelling you will see that LabelStudio spits out your data to {polygon,object,semantic}/completions/*.json. These are just data files, and you can then use these to train models for Tensorflow, PyTorch or Keras.
Let's say you are using the Tensorflow MaskRCNN model. You could use LabelStudio to label your images, convert the JSON files to a TFRecord, and train. You could then take your imperfect model, have it label an imageset, then manually cleanup the new imageset, rinse and repeat.
If you have any questions please don't hesitate to contact me at [email protected]
Citations
https://data.broadinstitute.org/bbbc/BBBC010/
"We used the C.elegans infection live/dead image set version 1 provided by Fred Ausubel and available from the Broad Bioimage Benchmark Collection [Ljosa et al., Nature Methods, 2012]."