RShiny Authentication with Polished on AWS Kubernetes
Jun 28, 2020
If you're looking for a hassle free way to add authentication to your RShiny Apps you should check out polished.tech. In their own words:
Polished is an R package that adds authentication, user management, and other goodies to your Shiny apps. Polished.tech is the quickest and easiest way to use polished.
Polished.tech provides a hosted API and dashboard so you don't need to worry about setting up and maintaining the polished API. With polished.tech you can stop worrying about boilerplate infrastructure and get back to building your core Shiny application logic.
Polished.tech is a hosted solution for adding authentication to your RShiny Apps. It is completely free for the first 10 users, which gives you plenty of freedom to play around with it.
In this post we'll go over how to:
- Quickly and easily get started with the polished.tech hosted solution and grab your API credentials
- Test out your API credentials with a pre built docker container
- Deploy an AWS Kubernetes (EKS) Cluster
- Securely add your API credentials to an EKS cluster
- Deploy a helm chart with a sample RShiny app using polished.tech authentication!
So let's get started!
Prerequisites
In order to complete the AWS portion of the tutorial you’ll need:
Docker
You will need Docker to run the Quickstart guide.
I always create a Docker image with all the CLI tools I need and keep a copy of any credentials directly in the project folder. You don’t need to especially know how to use Docker, as we will just be treating the container as a terminal.
If you prefer not to use Docker you will need to install all the CLI tools shown in the Dockerfile and run the shiny app locally.
AWS IAM User
If you want to deploy to AWS you’ll need an AWS IAM User, and that user’s API keys. For more information see the AWS docs.
This same AWS IAM user must have permission to create an EKS cluster. You can use this role, or a user with administrator privileges.
Quick Start
If you already have your Polished API Credentials you can start here.
docker run -it \
    --rm \
    -p 3838:3838 \
    -e POLISHED_APP_NAME="my_first_shiny_app" \
    -e POLISHED_API_KEY="XXXXXXXXXXXXXX" \
    jerowe/polished-tech:latest
Add your own credentials to the POLISHED_APP_NAME and the POLISHED_API_KEY.
Then open up a browser at localhost:3838 and login to your application using your polished.tech email and password combo.
Sign up and Get your Credentials
All these instructions are in the docs, and only here for the sake of completeness.
Sign up
Head over to the dashboard URL and register. From there, log in, and you'll see your account dashboard.
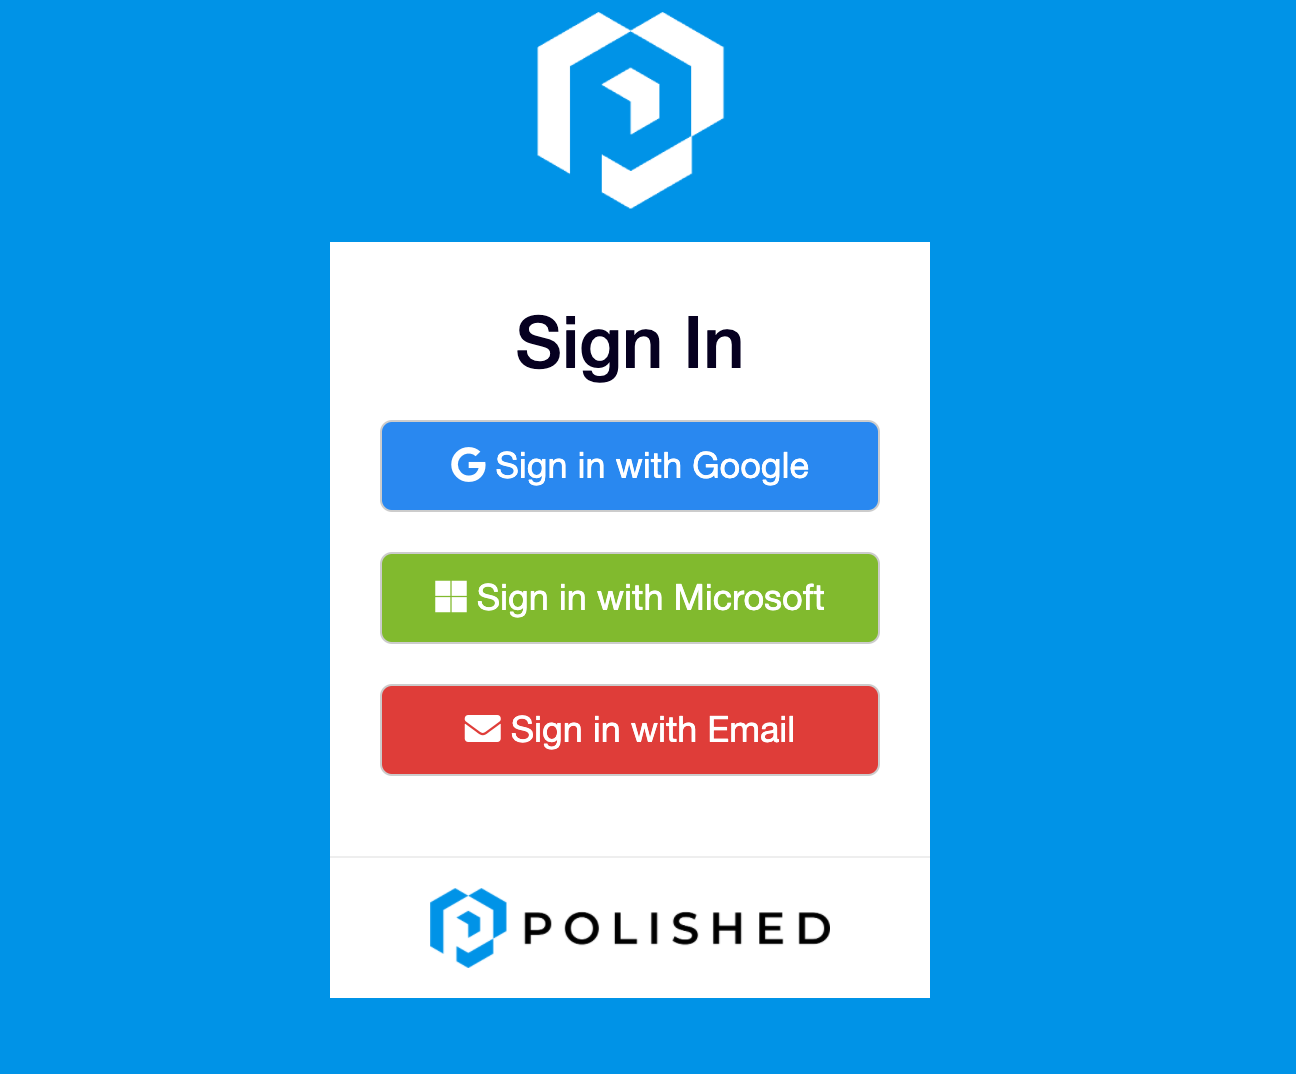
If you use Google or Microsoft you will be prompted to log in with those accounts. If you use email you will be prompted to create a password.
Optional - Social Login vs Email & Password
If you want to use the Social Login and deploy on AWS you will need to setup Firebase with your external domain. You only need to complete this step if you are deploying to a host other than localhost and want to use a social login provider such as Google. We’ll go into more detail when we deploy to AWS further down.
Get your API Secret Key
Head on over to the Dashboard, on the left-hand menu, click Accounts to get your Secret Key.

Right it down somewhere! From here on out we will refer to it as the POLISHED_API_KEY.
Create an App
You must create an app for this whole scheme to work.
On the left-hand menu click Shiny Apps.

Write it down somewhere! From here on out we will refer to it as the POLISHED_APP_NAME.
Associate the App to your User
(And potentially other users!)
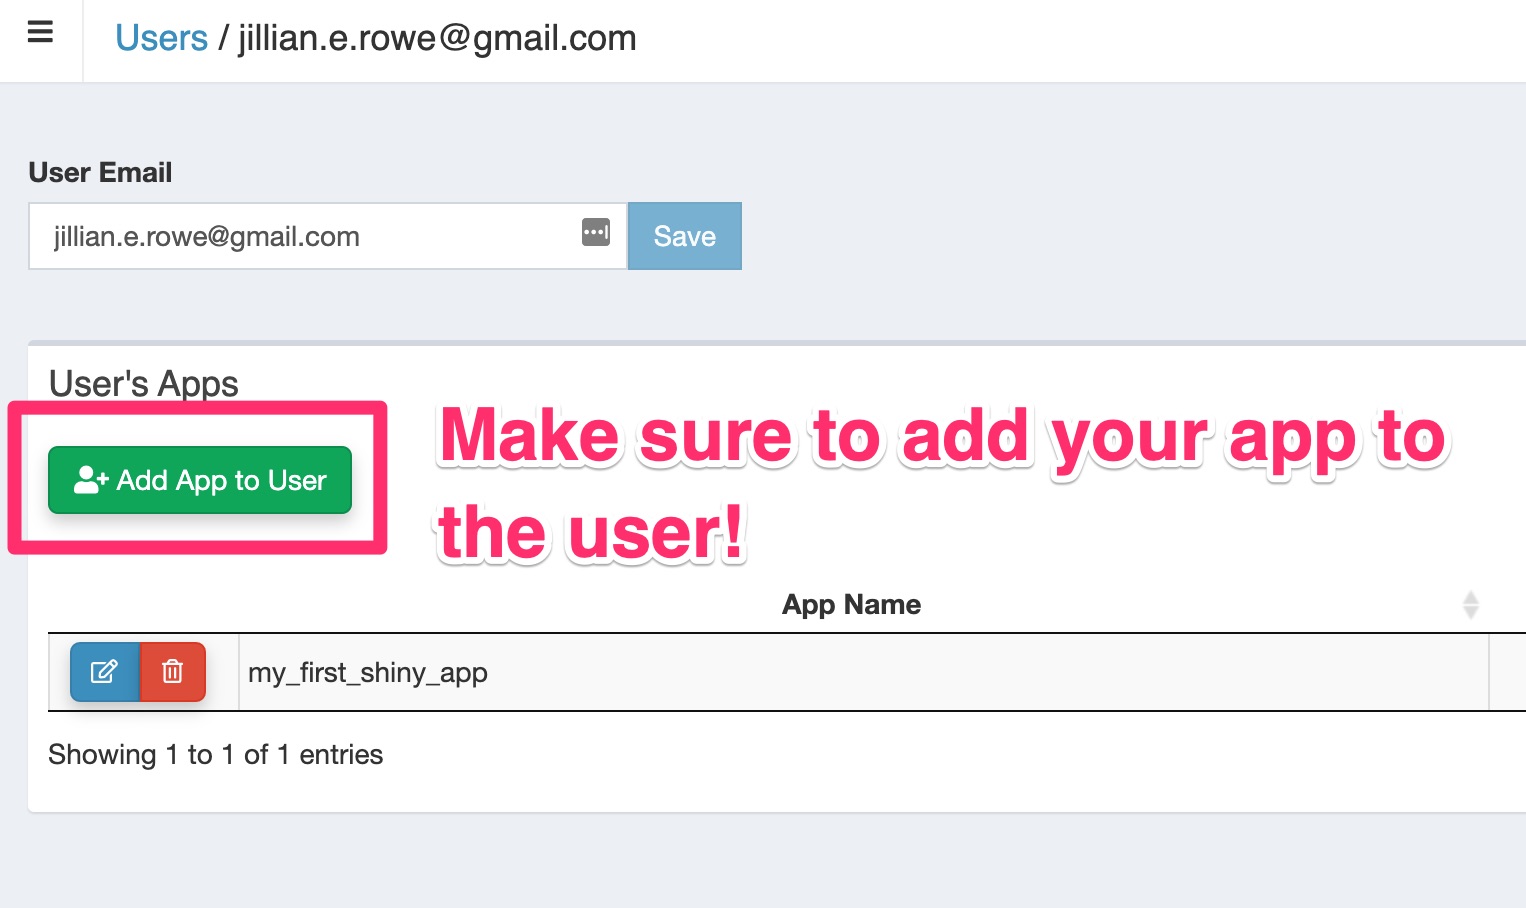
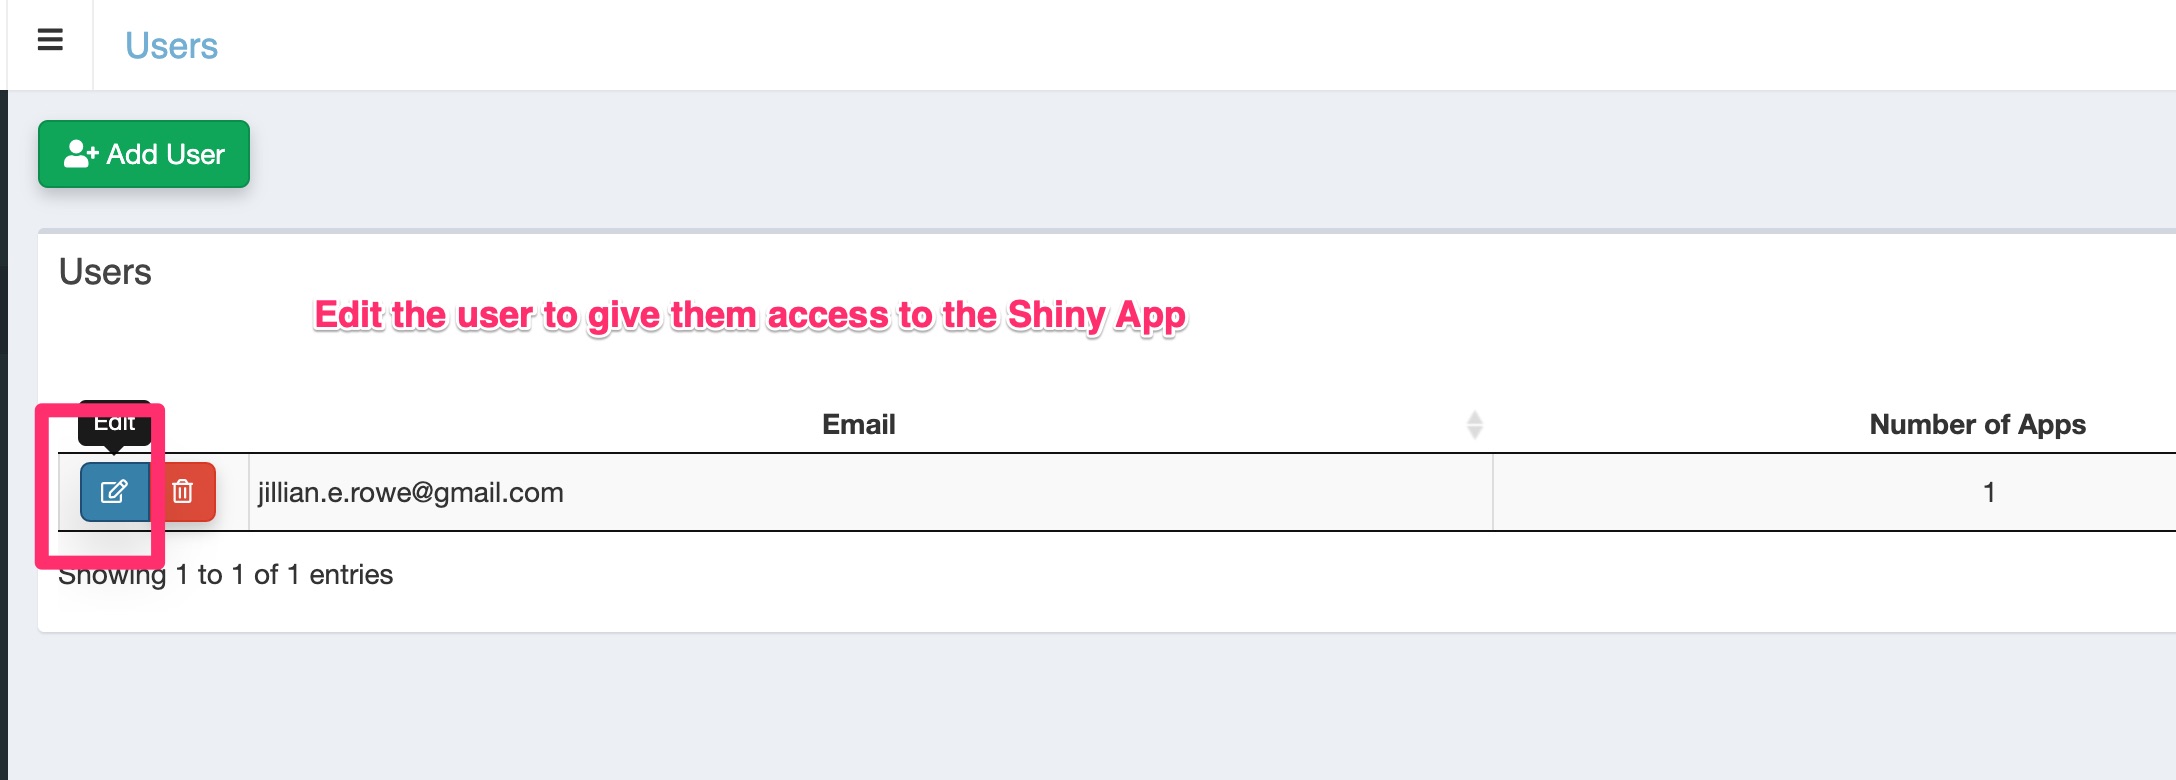
Once you have an app, make sure to associate it with your user. This one got me the first time around because I don't follow instructions well. ;-) If you skip this step you won't be able to log in.
On your dashboard in the left-hand menu go to Users, and associate the app to the user(s).
You can either edit the user to allow access to the app or edit the app to give access to the user. Both accomplish the same goal.
From the Users Menu
From the App Menu
Test Your Credentials
If you just want to test your credentials run the docker run command.
docker run -it \
    --rm \
    -p 3838:3838 \
    -e POLISHED_APP_NAME="my_first_shiny_app" \
    -e POLISHED_API_KEY="XXXXXXXXXXXXXX" \
    jerowe/polished-tech:latest
With, of course, the credentials that I know you wrote down earlier. ;-)
Open your browser at localhost:3838 and login with your user email and password. You should see a screen that has your user UID and session info. Success!
Let's Deploy Our App!
For the next part of the tutorial, we will discuss getting your app out there into the wild! I chose Kubernetes for this because it works absolutely everywhere, and the hosted AWS solution is nice. Also, deploying to Kubernetes allows you to easily encrypt your API keys, database credentials, etc.
Grab the code
If you would like to follow along clone the Github repo.
git clone https://github.com/jerowe/rshiny-with-polished-tech-eksProject Structure
There are two directories in the GitHub repo, auto-deployment, and rshiny-app-polished-auth.
The auto-deployment has a (slightly modified) Terraform EKS recipe to first deploy our EKS cluster, install our helm chart, and do some networking magic.
If you've never used Terraform before don't worry. It's really like a Makefile with a nicer syntax. A helm chart is the Kubernetes preferred method of packaging and defining applications.
Getting deep into the Helm chart would make this post way too long, but I go into more in this post.
There is also a Dockerfile in the root of the project system. This Dockerfile has everything you need to both deploy the EKS cluster and install the helm chart. It installs the aws-cli, terraform, helm, and kubectl cli tools. You could install these things on your local computer, but that would be painful. ;-)
├── Dockerfile
├── README.md
├── auto-deployment
│   ├── eks
│   │   ├── aws.tf
│   │   ├── helm.tf
│   │   ├── helm_charts
│   │   │   ├── rshiny-eks
│   │   │   │   ├── Chart.yaml
│   │   │   │   ├── charts
│   │   │   │   ├── templates
│   │   │   │   │   ├── NOTES.txt
│   │   │   │   │   ├── _helpers.tpl
│   │   │   │   │   ├── deployment.yaml
│   │   │   │   │   ├── ingress.yaml
│   │   │   │   │   ├── service.yaml
│   │   │   │   │   ├── serviceaccount.yaml
│   │   │   │   │   └── tests
│   │   │   │   │       └── test-connection.yaml
│   │   │   │   └── values.yaml
│   │   ├── main.tf
│   │   ├── outputs.tf
│   │   └── variables.tf
│   └── terraform-state
│       ├── main.tf
├── build_and_run_polished_app.sh
└── rshiny-app-polished-auth
    ├── Dockerfile
    ├── app.R
    └── shiny-server.sh
The Docker Image
I built a docker image based on the Rocker/Shiny image.
The important things to note here are that I deleted the default index.html and other sample apps, and added in my own app.R.
Environmental Variables
I added a startup CMD to add the POLISHED_* variables to /home/shiny/.Renviron. The shiny-server runs a clean process where it does not pick up on any outside environmental variables.
# rshiny-app-polished-auth/Dockerfile
FROM rocker/shiny:4.0.0

# Install everything needed for polished

RUN apt-get update && apt-get install -y \
    libssl-dev


RUN R -e "install.packages('remotes')"
RUN R -e "remotes::install_github('tychobra/polished')"
RUN rm -rf /srv/shiny-server/*
COPY app.R /srv/shiny-server/app.R

COPY shiny-server.sh /usr/bin/shiny-server.sh
The shiny-server process runs cleanly, meaning we have to load in our POLISHED_*environmental variables from a ~/.Renviron file. If you need to add any other variables make sure you do that here and rebuild the docker image!
# rshiny-app-polished-auth/shiny-server.sh
#!/bin/sh

# Make sure that we add our Polished to our /home/shiny/.Renviron
env | grep POLISHED > /home/shiny/.Renviron
chown shiny:shiny /home/shiny/.Renviron

# Make sure the directory for individual app logs exists
mkdir -p /var/log/shiny-server
chown shiny.shiny /var/log/shiny-server

if [ "$APPLICATION_LOGS_TO_STDOUT" != "false" ];
then
    # push the "real" application logs to stdout with xtail in detached mode
    exec xtail /var/log/shiny-server/ &
fi

# start shiny server
exec shiny-server 2>&1
Update the AWS Region
The AWS region is set as us-east-1. If you need to change it take a look at auto-deployment/eks/variables.tf and auto-deployment/terraform-state/main.tf.
Optional - Firebase Setup for Social Login
If you want to use social login (Google, Microsoft, etc) you will need to get your own Firebase account and credentials. If you’re using email and password you can skip this step!
First we’ll set up the Firebase Project, and then we’ll register an app to that project.
FireBase Project Setup
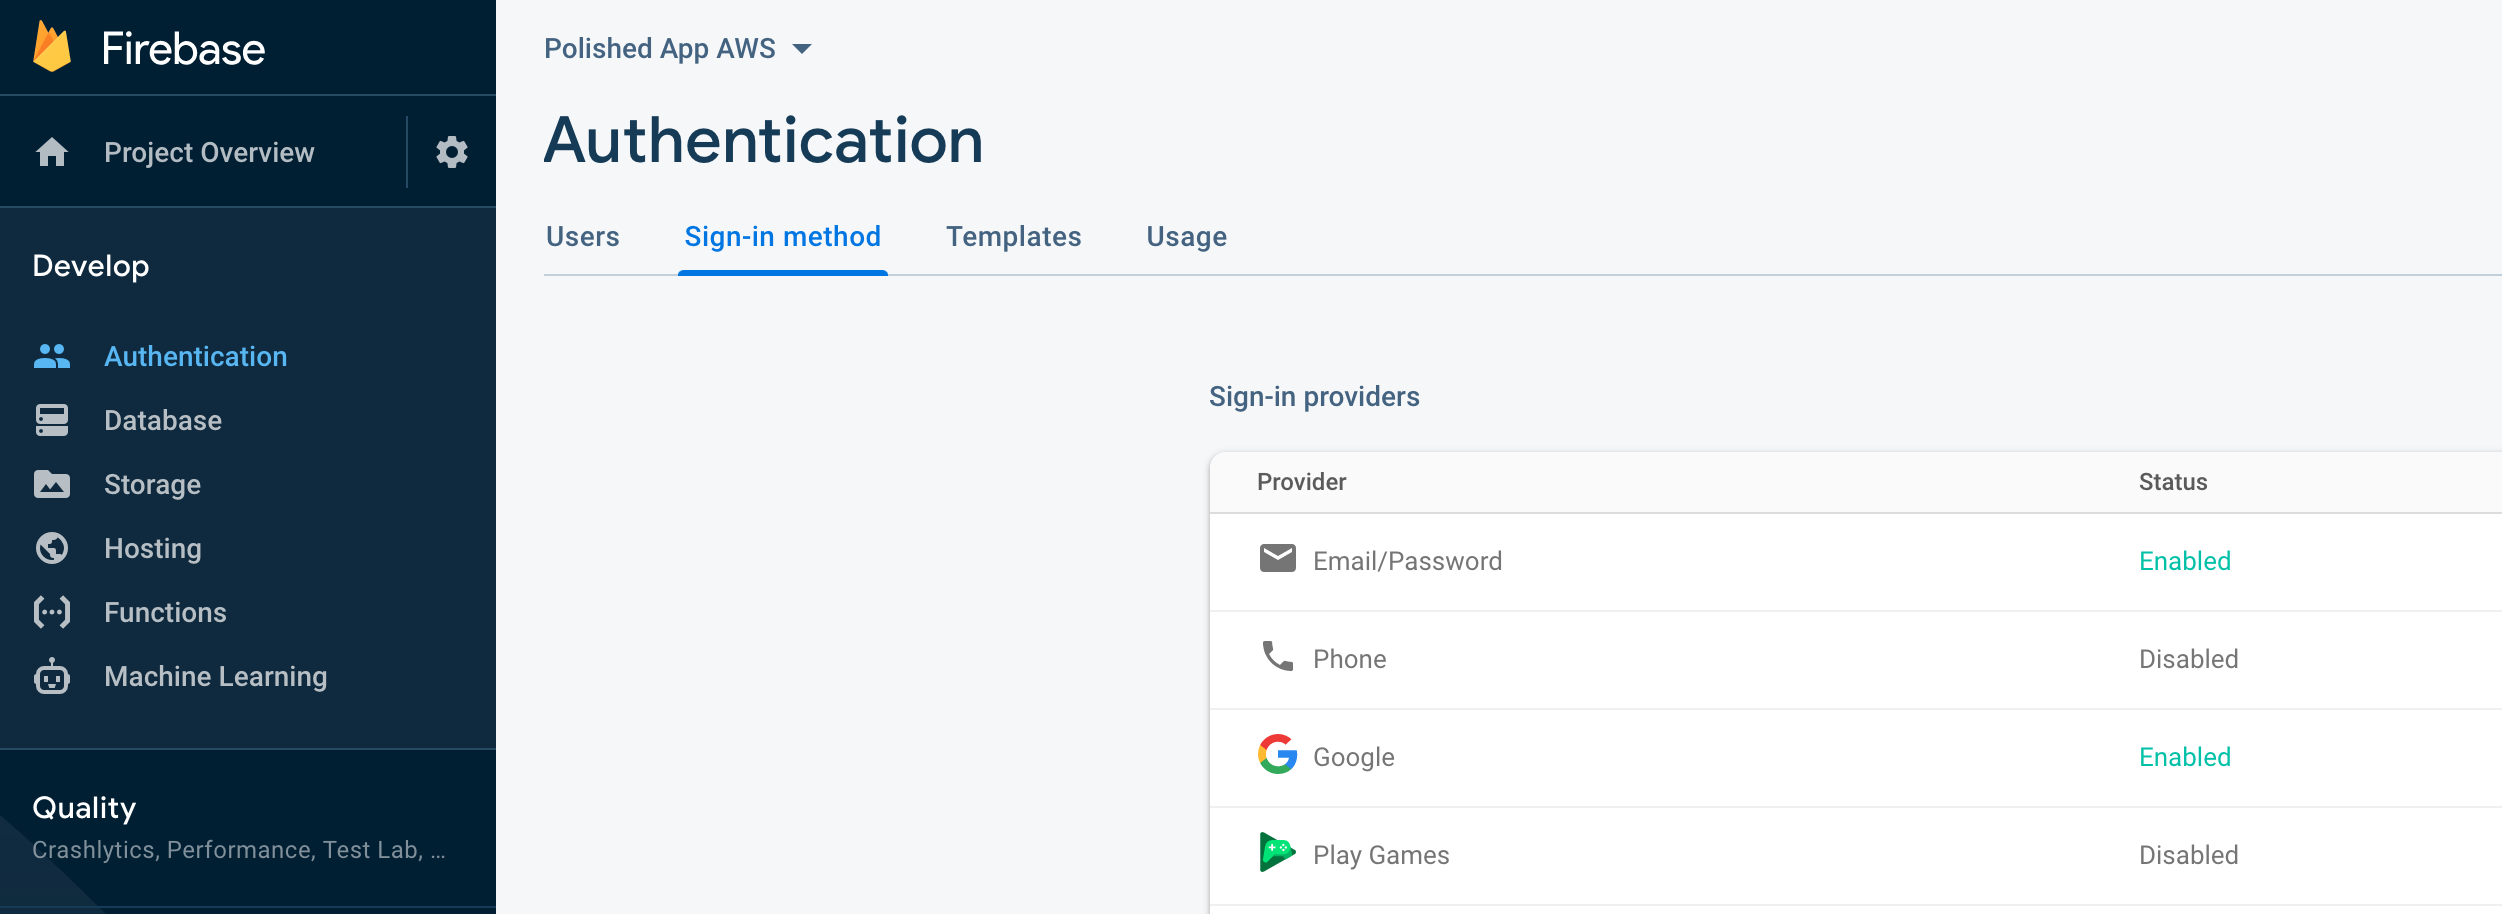
Head on over to the FireBase console to set up a project. It’s pretty simple and the wizard will walk you through the steps. From there go to _Develop -> Authentication -> Sign-in Method. _Then enable Email + Password along with whichever Social Provider you’d like.
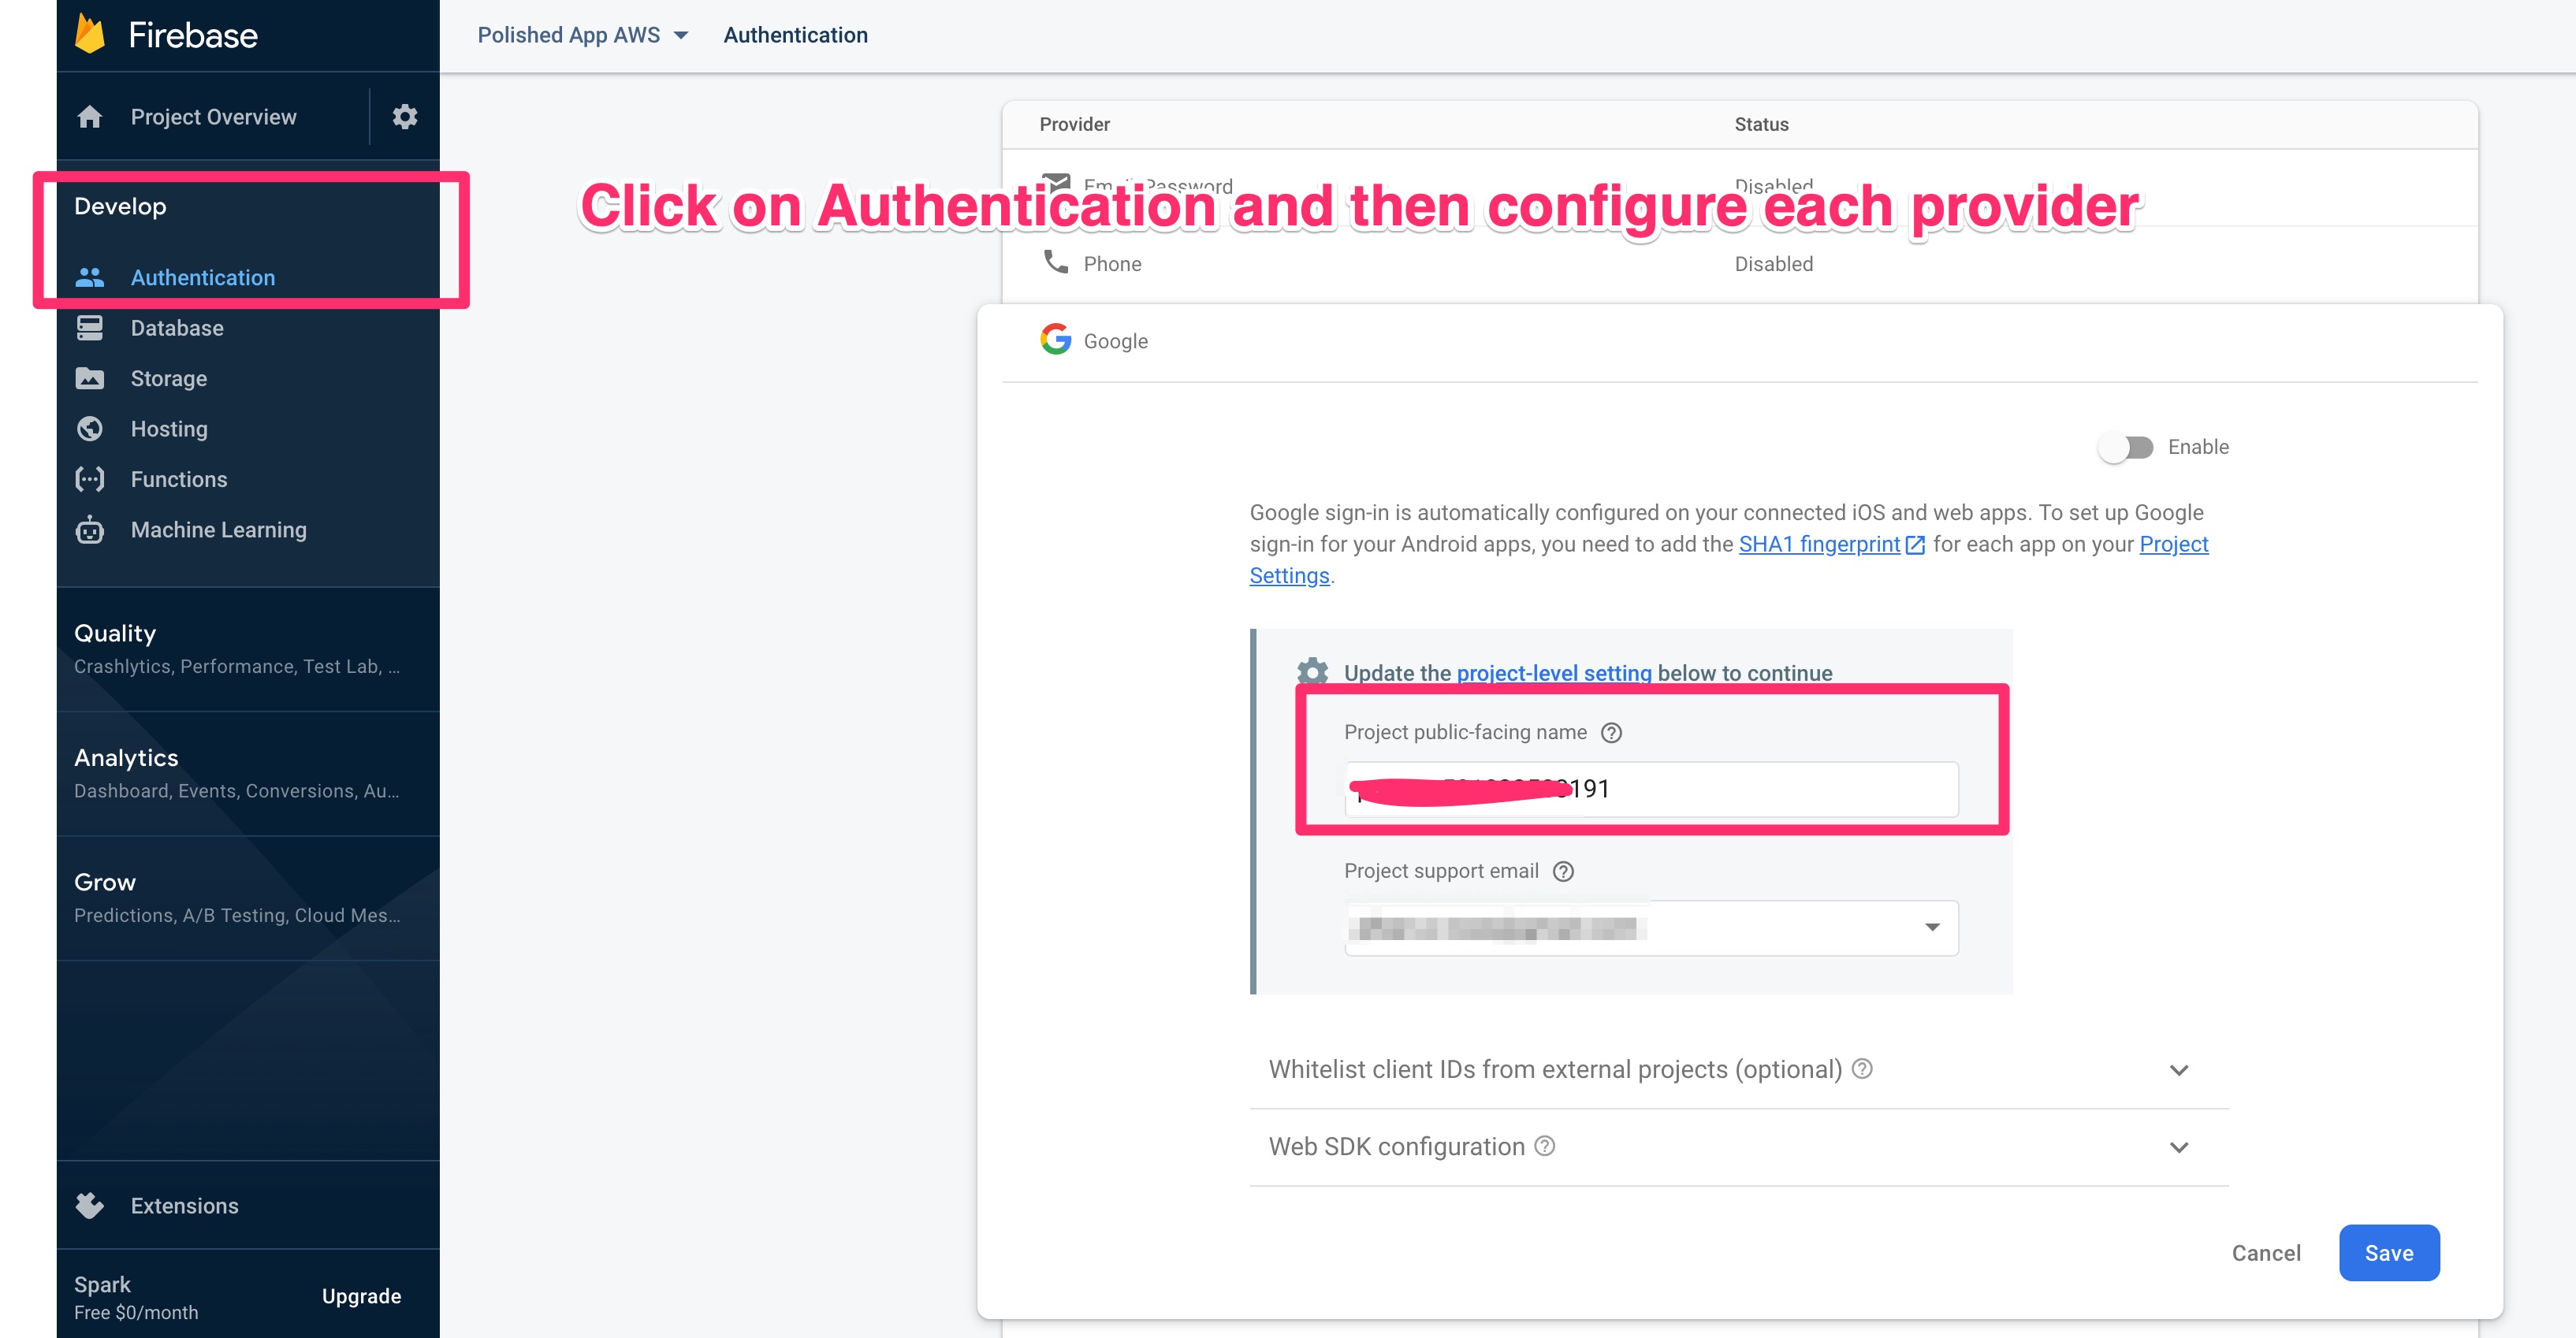
Make sure your social logins are green and enabled!
Setup your FireBase App
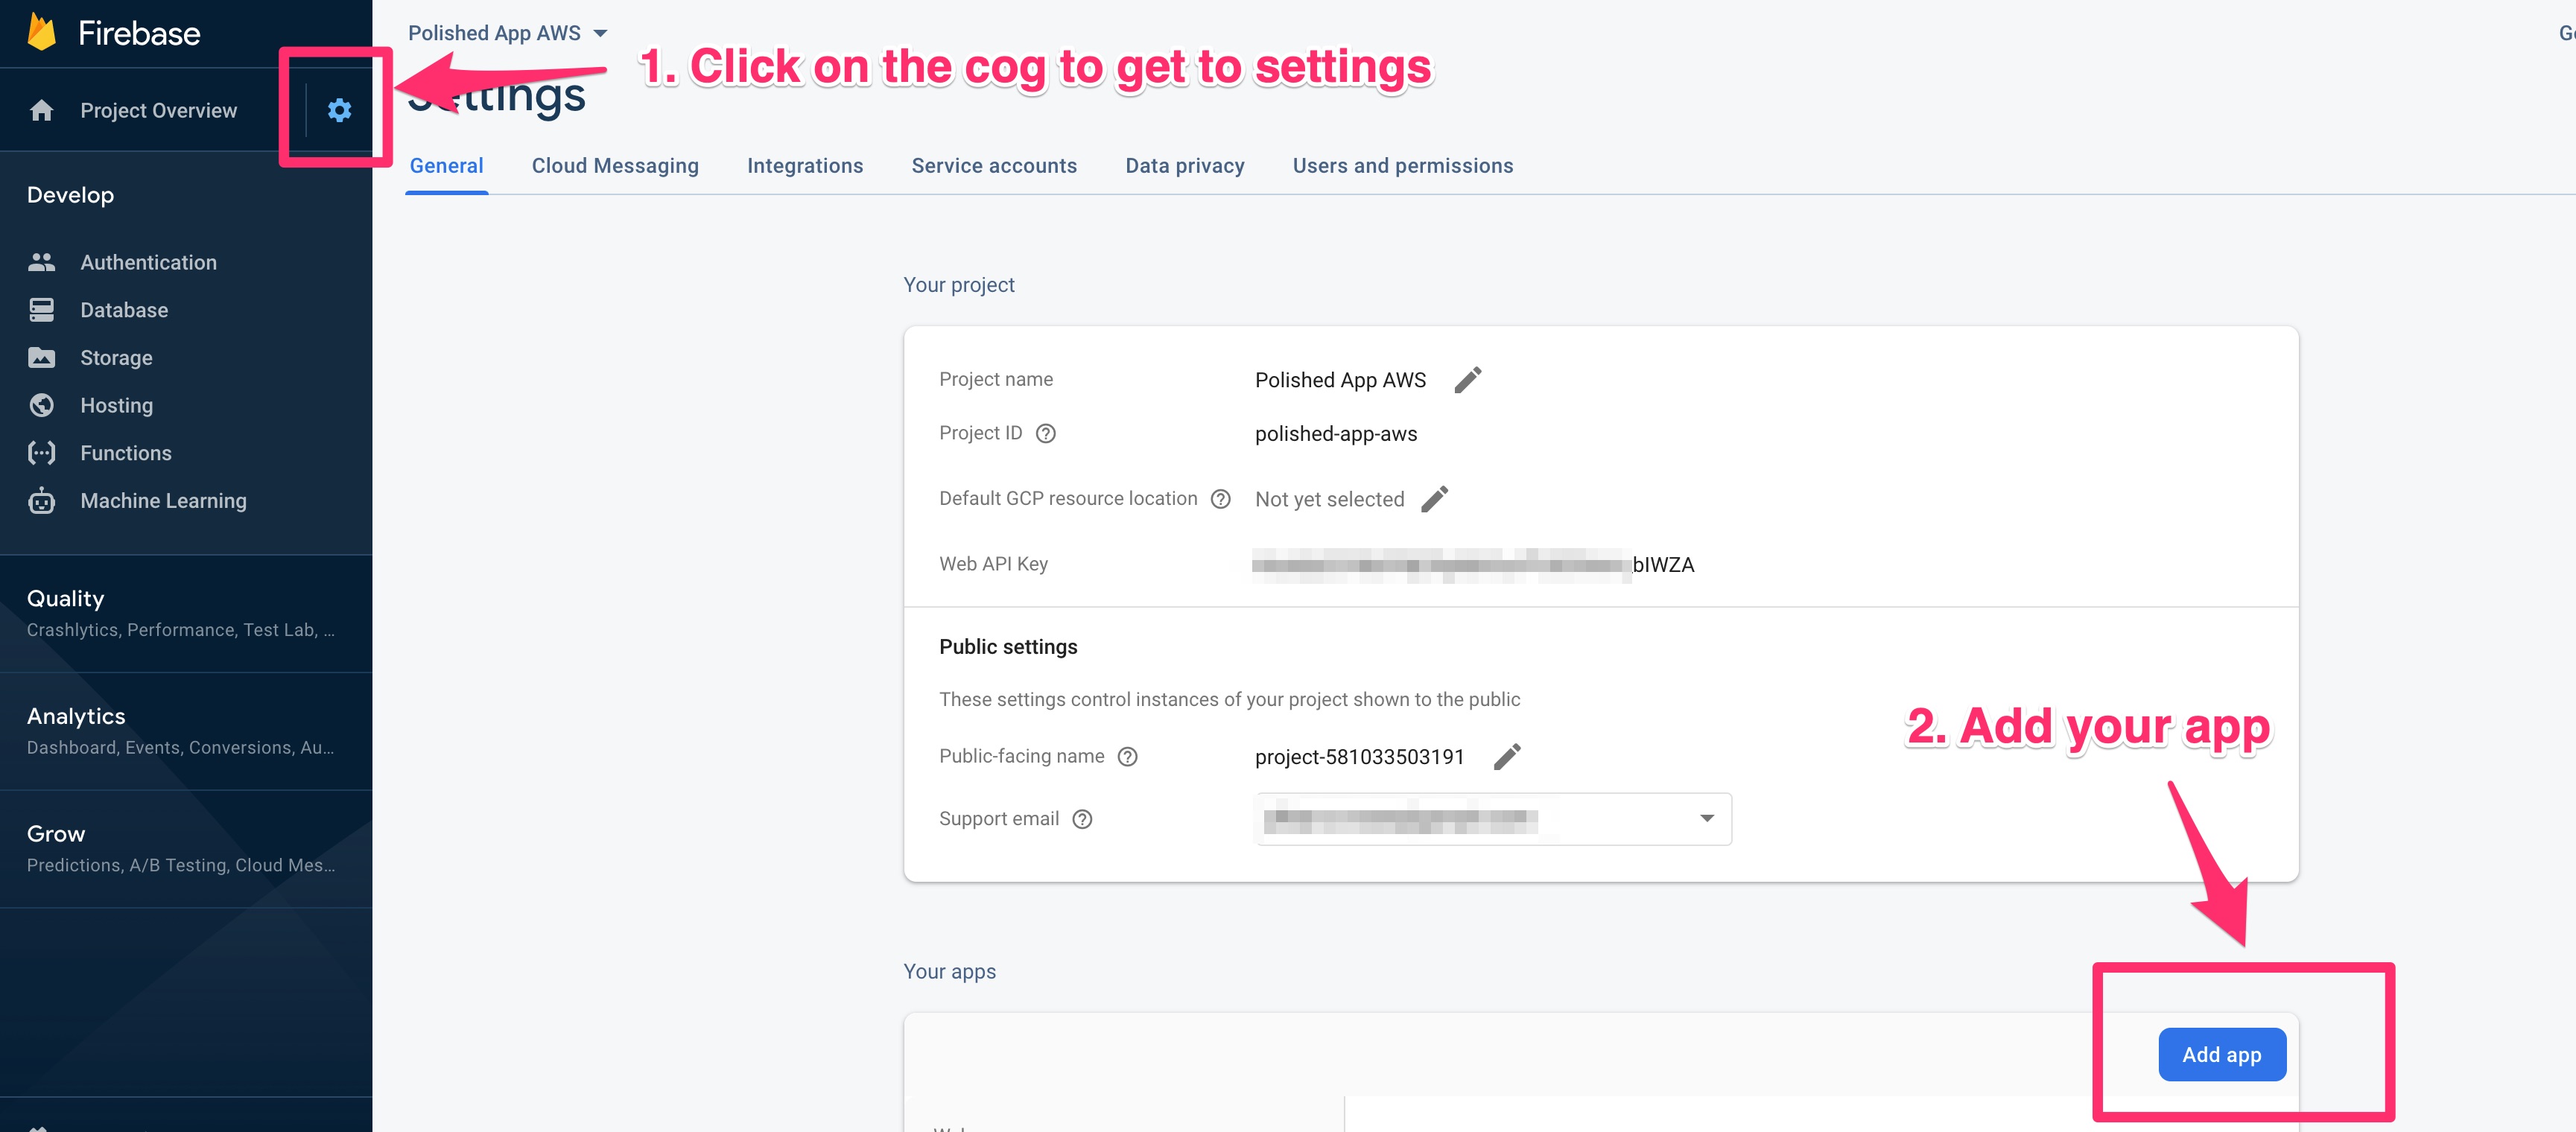
Within your project you’ll need to register an app and grab the credentials. In your Firebase project click on the settings icon, then on Add App.
Once you’ve registered your app you’ll get your app credentials.
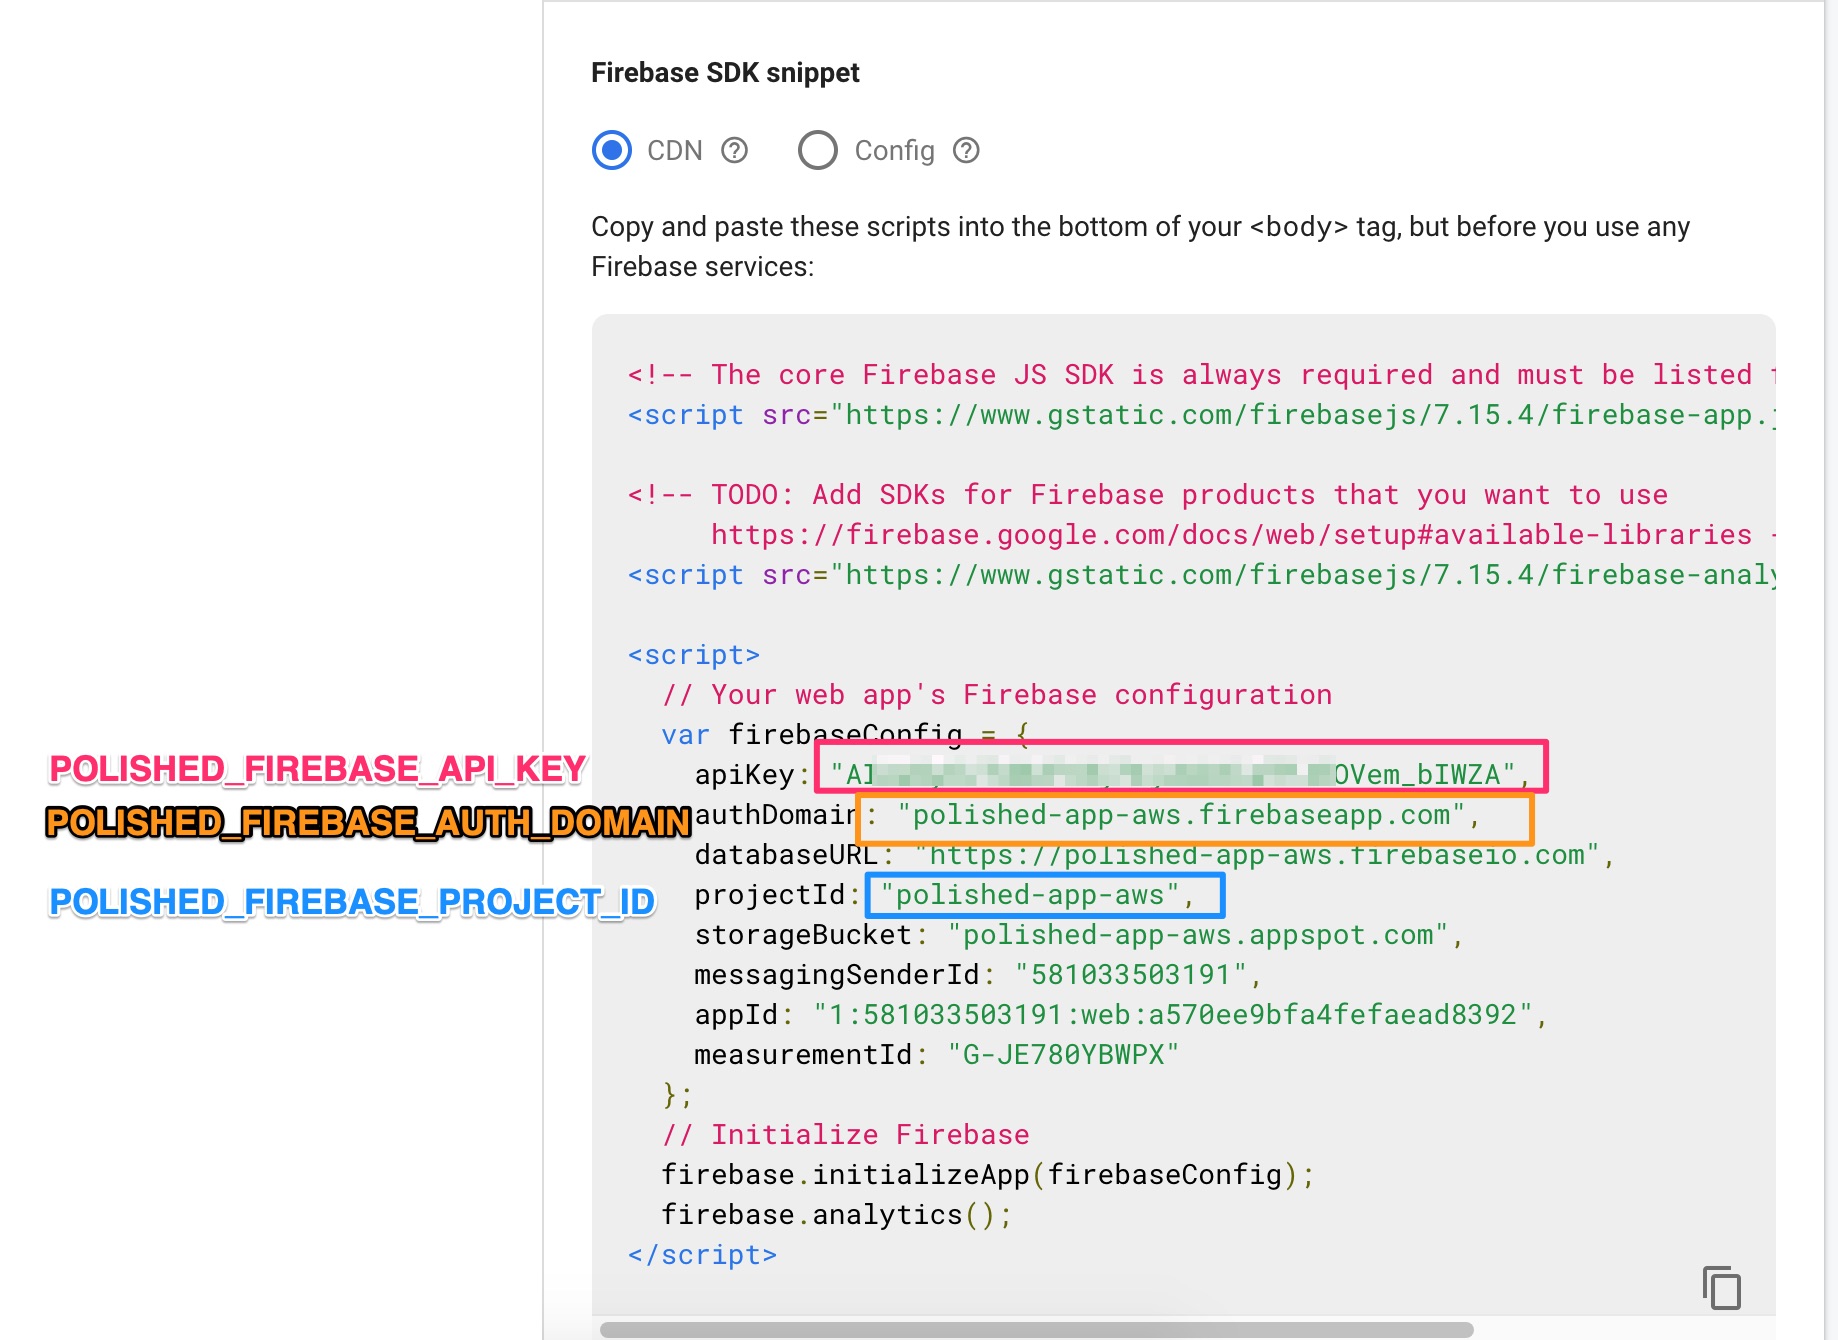
You’ll add these to your terraform recipe in the next step.
Add your Polished Credentials to the Terraform Recipe
Before you deploy your EKS cluster, make sure that you add in your Polished credentials.
# auto-deployment/eks/variables.tf
# CHANGE THESE!

...

# Then make sure to add your user to the app!
variable "POLISHED_APP_NAME" {
  default = "my_first_shiny_app"
}

# Grab this from the polished.tech Dashboard -> Account -> Secret
variable "POLISHED_API_KEY" {
  default = "XXXXXXXXXXXXXXXXXX"
}

# Firebase credentials
# Only add these if you've setup your own firebase credentials
variable "POLISHED_FIREBASE_API_KEY" {
  default = ""
}
If you’re following along with the Firebase instructions make sure you add your Firebase credentials too. If you aren’t just leave those as is.
Kubernetes Secrets
You see that we add in our POLISHED_* variables as terraform variables, which are then added to our Kubernetes cluster as Secrets.
Secrets get a little tricky because it feels like you have to add them to a million places, and it’s easy to get them out of sync. I'd suggest picking ONE, and only ONE way to reference your variables. Don't get cute with it! ;-)
Your Kubernetes Secrets (generally) appear in 3 places:
- In your Terraform Recipe (as secrets)
- In your helm chart’s environmental variables in either
values.yaml - Or in the
templates/deployment.yaml.
The second just really depends on the way that your chart is organized.
Secrets can be tricky, so I'm showing them in a few different ways.
Kubernetes Secrets - Code View
Here are our secrets in the terraform deployment:
# auto-deployment/eks/main.tf
locals {
  secrets = [
    {
      name = "polished"
      data = {
        app_name = var.POLISHED_APP_NAME
        api_key = var.POLISHED_API_KEY
      }
    },
  ]
}

resource "kubernetes_secret" "main" {
  depends_on = [
    module.eks,
  ]
  count = length(local.secrets)

  metadata {
    name = local.secrets[count.index].name
    labels = {
      Project = local.cluster_name
      Owner = "terraform"
    }

  }

  data = local.secrets[count.index].data

  type = "Opaque"
}
The Firebase secrets are there too, just not shown for the sake of not making this an encyclopedia. Now we read them into our RShiny App Deployment, telling Helm that they are Kubernetes secrets.
# auto-deployment/helm_charts/rshiny-eks/values.yaml
env:
  - name: POLISHED_API_KEY
    valueFrom:
      secretKeyRef:
        # In terraform this is locals.secrets.[0].polish.data.api_key
        name: polished
        key: api_key
  - name: POLISHED_APP_NAME
    valueFrom:
      secretKeyRef:
        # In terraform this is locals.secrets.[0].polish.data.app_name
        name: polished
        key: app_name
Then, finally, in our actual deployment we add in the env keys from our values.yaml.
     containers:
        - name: {{ .Chart.Name }}
          securityContext:
            {{- toYaml .Values.securityContext | nindent 12 }}
          image: "{{ .Values.image.repository }}:{{ .Values.image.tag }}"
          imagePullPolicy: {{ .Values.image.pullPolicy }}
          # Env vars are read in HERE
          env:
            - name: TAG
              value: {{ .Values.image.tag }}
            {{- toYaml .Values.env | nindent 12 }}
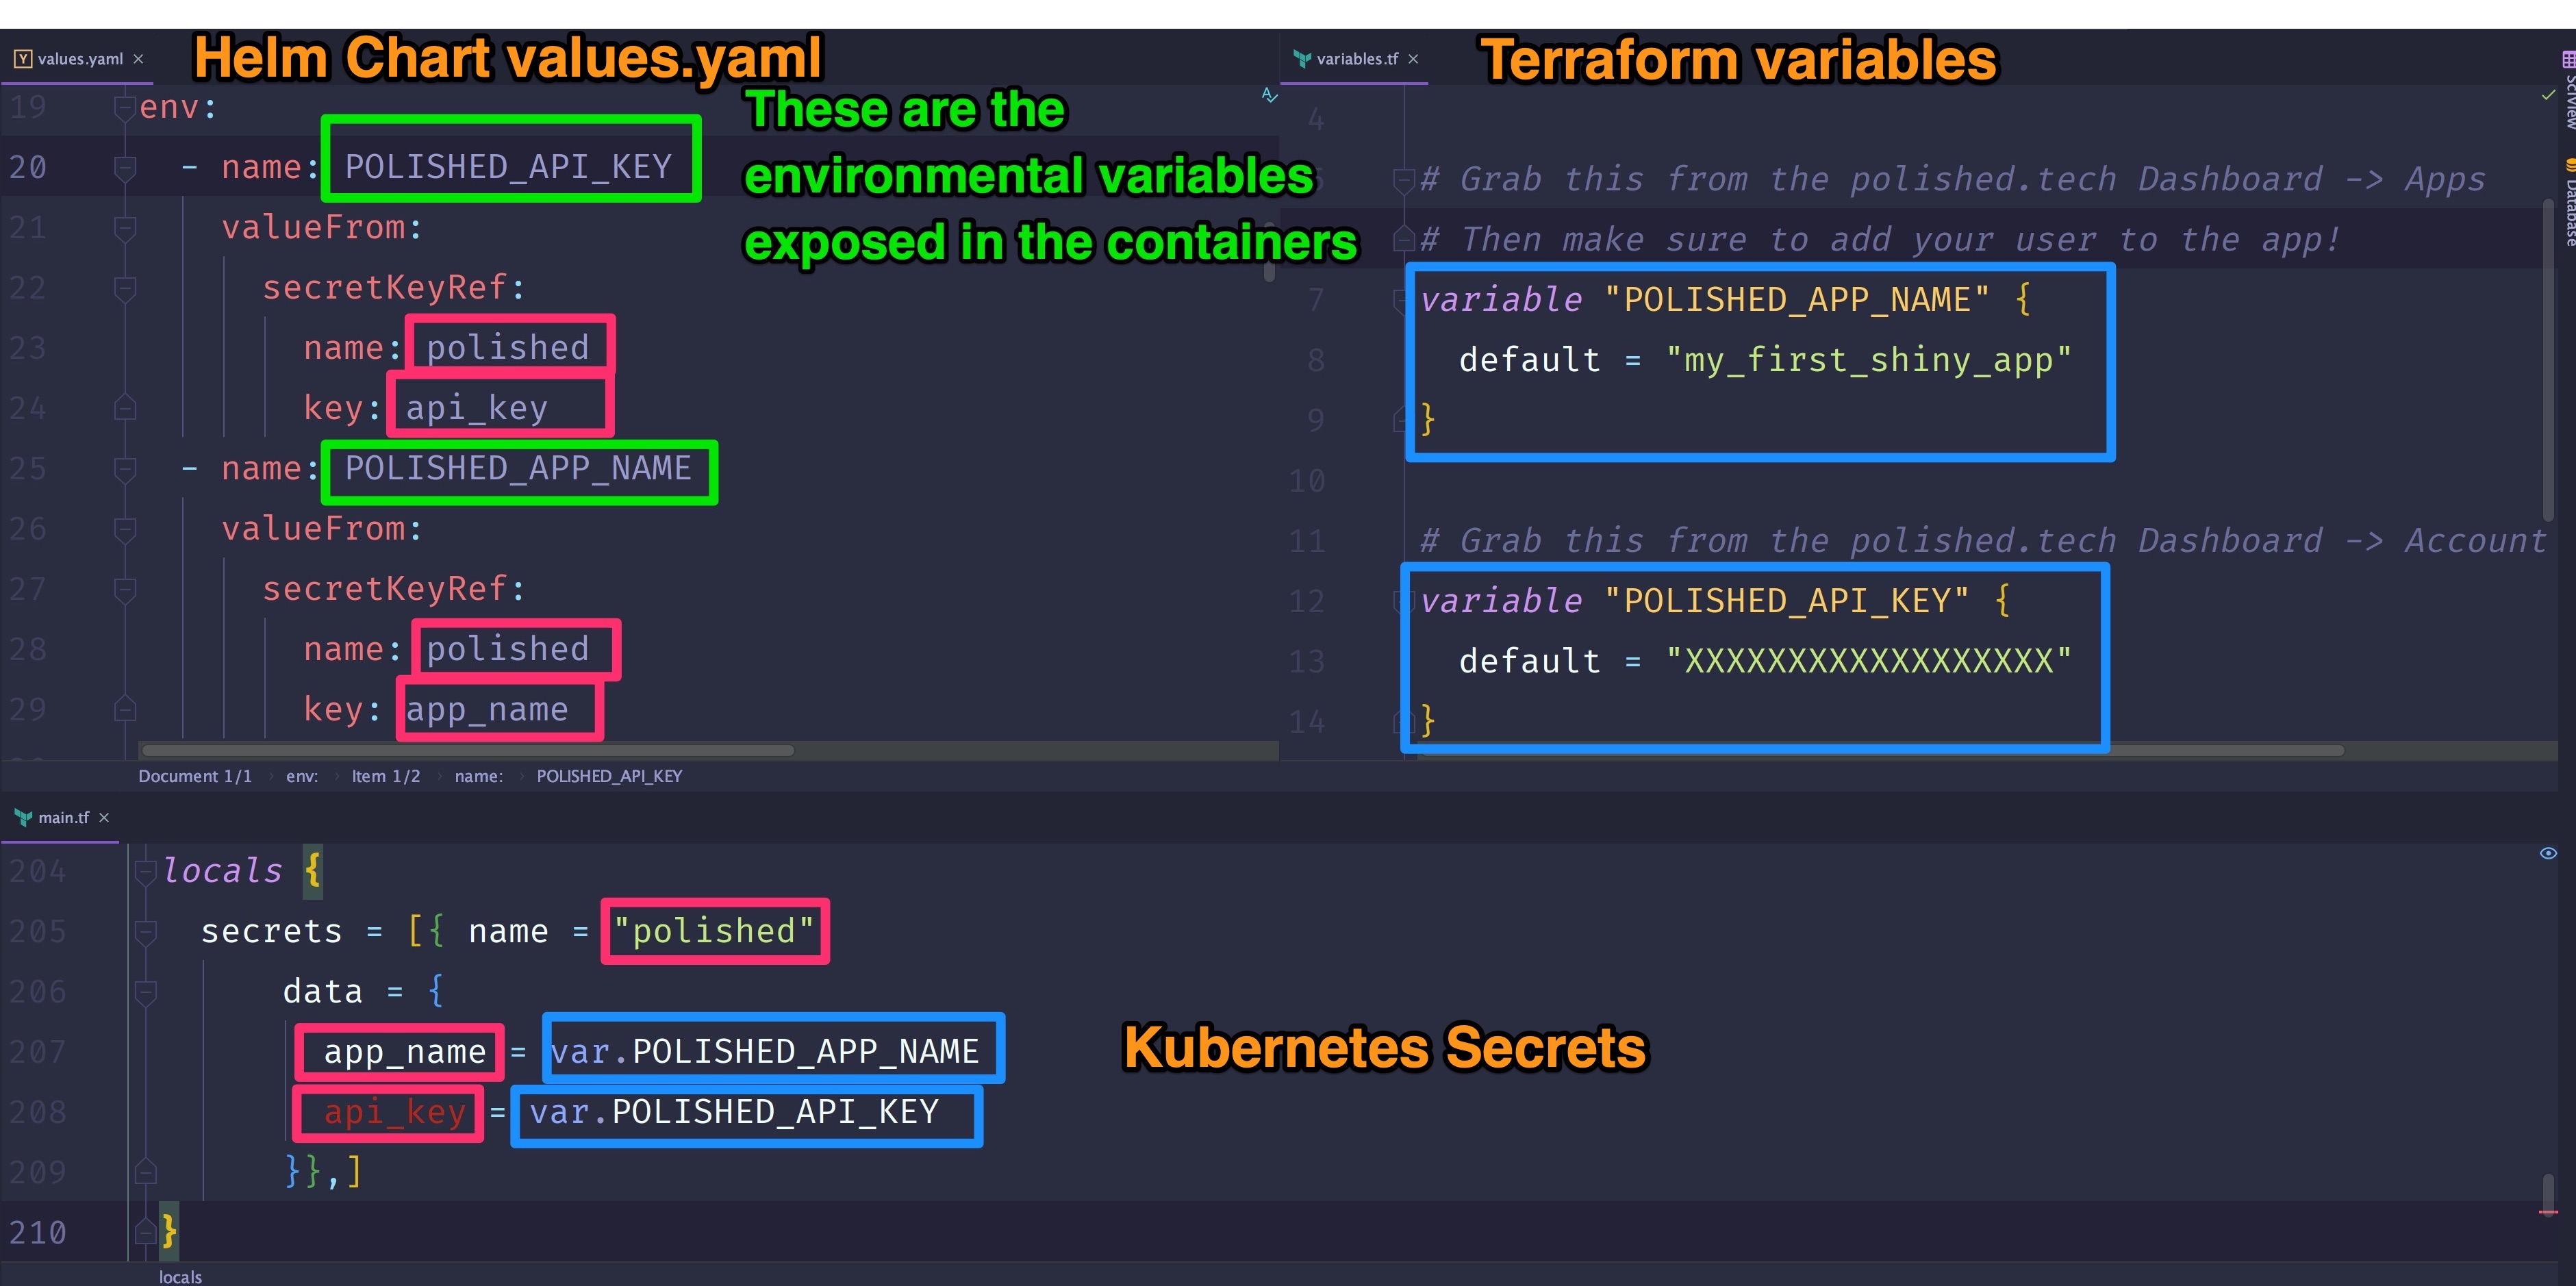
Kubernetes Secrets - Image View
Here's a side by side view of the Secrets declared in our:
- Terraform Variables -
auto-deployment/eks/variables.tf - Kubernetes Secrets -
auto-deployment/eks/main.tf - In the Helm chart -
auto-deployment/eks/helm_charts/rshiny-eks/values.yaml( and in thecontainers[0].envofauto-deployment/eks/helm_charts/rshiny-eks/templates/deployment.yaml)
Deploy to an AWS Kubernetes Cluster (EKS)
Now that we've covered all the basics let's finally deploy our cluster!
Build the Terraform Docker Image
I like having everything I need to deploy a particular project in a Dockerfile. I have one of these for nearly every project I work on, because no one wants to keep track of deployments.
Most of my projects look like:
├── .aws
├── Dockerfile
├── README.md
├── auto-deployment
With the .aws directory having the AWS credentials for the project, the Dockerfile having the cli tools needed for deployment, and then the actual auto-deploy. If you don’t already have your AWS CLI configured you can read more about it on the AWS docs.
# From the project directory
docker build -t eks-k8 .
# If your aws credentials are someplace else be sure to change this!
# The default AWS cli credentials location is home
# If you keep your .aws credentials in the project folder use this command
#docker run -it -v "$(pwd):/project" -v "$(pwd)/.aws:/root/.aws" eks-k8 bash
# If your AWS credentials are in ~/.aws use this one
docker run -it -v "$(pwd):/project" -v "${HOME}/.aws:/root/.aws" eks-k8 bash
This will create an image with everything you need, and then drop you into the shell. From there treat your image like any other terminal.
Initialize The Terraform State
Remember how I said earlier Terraform is sort of like a Makefile? It keeps track of what operations it's performed, resources it's created or destroyed, as a part of its state. It can either keep track of those locally or in an S3 bucket or other types of storage. In our case, we'll keep track of the state in an S3 Bucket.
Now, S3 bucket names must be globally unique. This means that you and I can’t have the same S3 bucket name! I use a random number generator but you can also just change the name to something unique in_ auto-deployment/terraform-state/main.tf_
# From within the eks-k8 docker image
cd /project/auto-deployment/terraform-state
terraform init; terraform refresh; terraform apply -auto-approve
Deploy the Cluster!
Finally!
In one fell swoop, we will deploy our cluster, configure our various CLIs, install our helm chart, and get our external URL!
# From within the eks-k8 docker image
cd /project/auto-deployment/eks
terraform init; terraform refresh; terraform apply -auto-approve
Occasionally, stuff times out. You may have to run this command a few times. Grab a snack and watch it go!
By the end, you should see something like this -

Check out our RShiny App
If you were paying attention you will see lots and lots of output from the terraform command.
For the impatient, what we really want is to run this command to get the external URL.
export EXPOSED_URL=$(kubectl get svc --namespace default rshiny-nginx-ingress-controller -o json | jq -r '.status.loadBalancer.ingress[]?.hostname')
echo $EXPOSED_URL
Optional - Add External Domain to Firebase
If you’ve been following along with setting up your own Firebase account then you will need to grab that external URL and add it to the Firebase Console. Go to Develop -> Authentication -> Sign in Methods -> Authorized Domains.

Success!
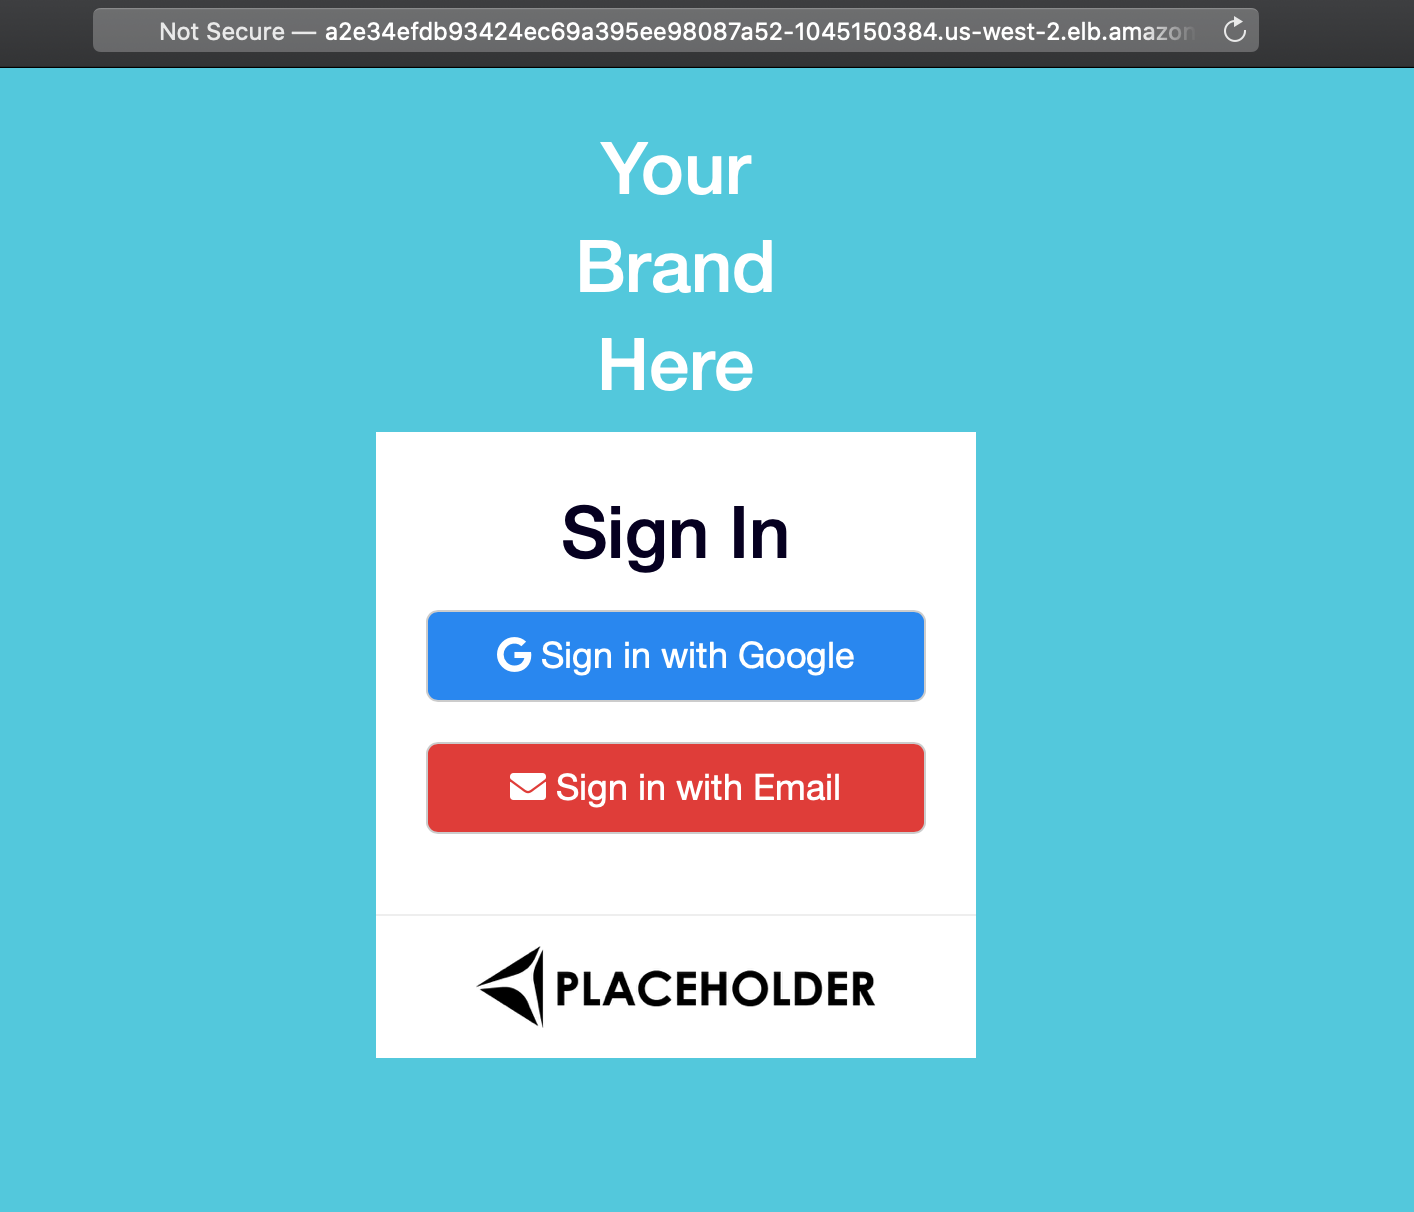
Grab the $EXTERNAL_URL and open up a browser. You should see the polished.tech login page!
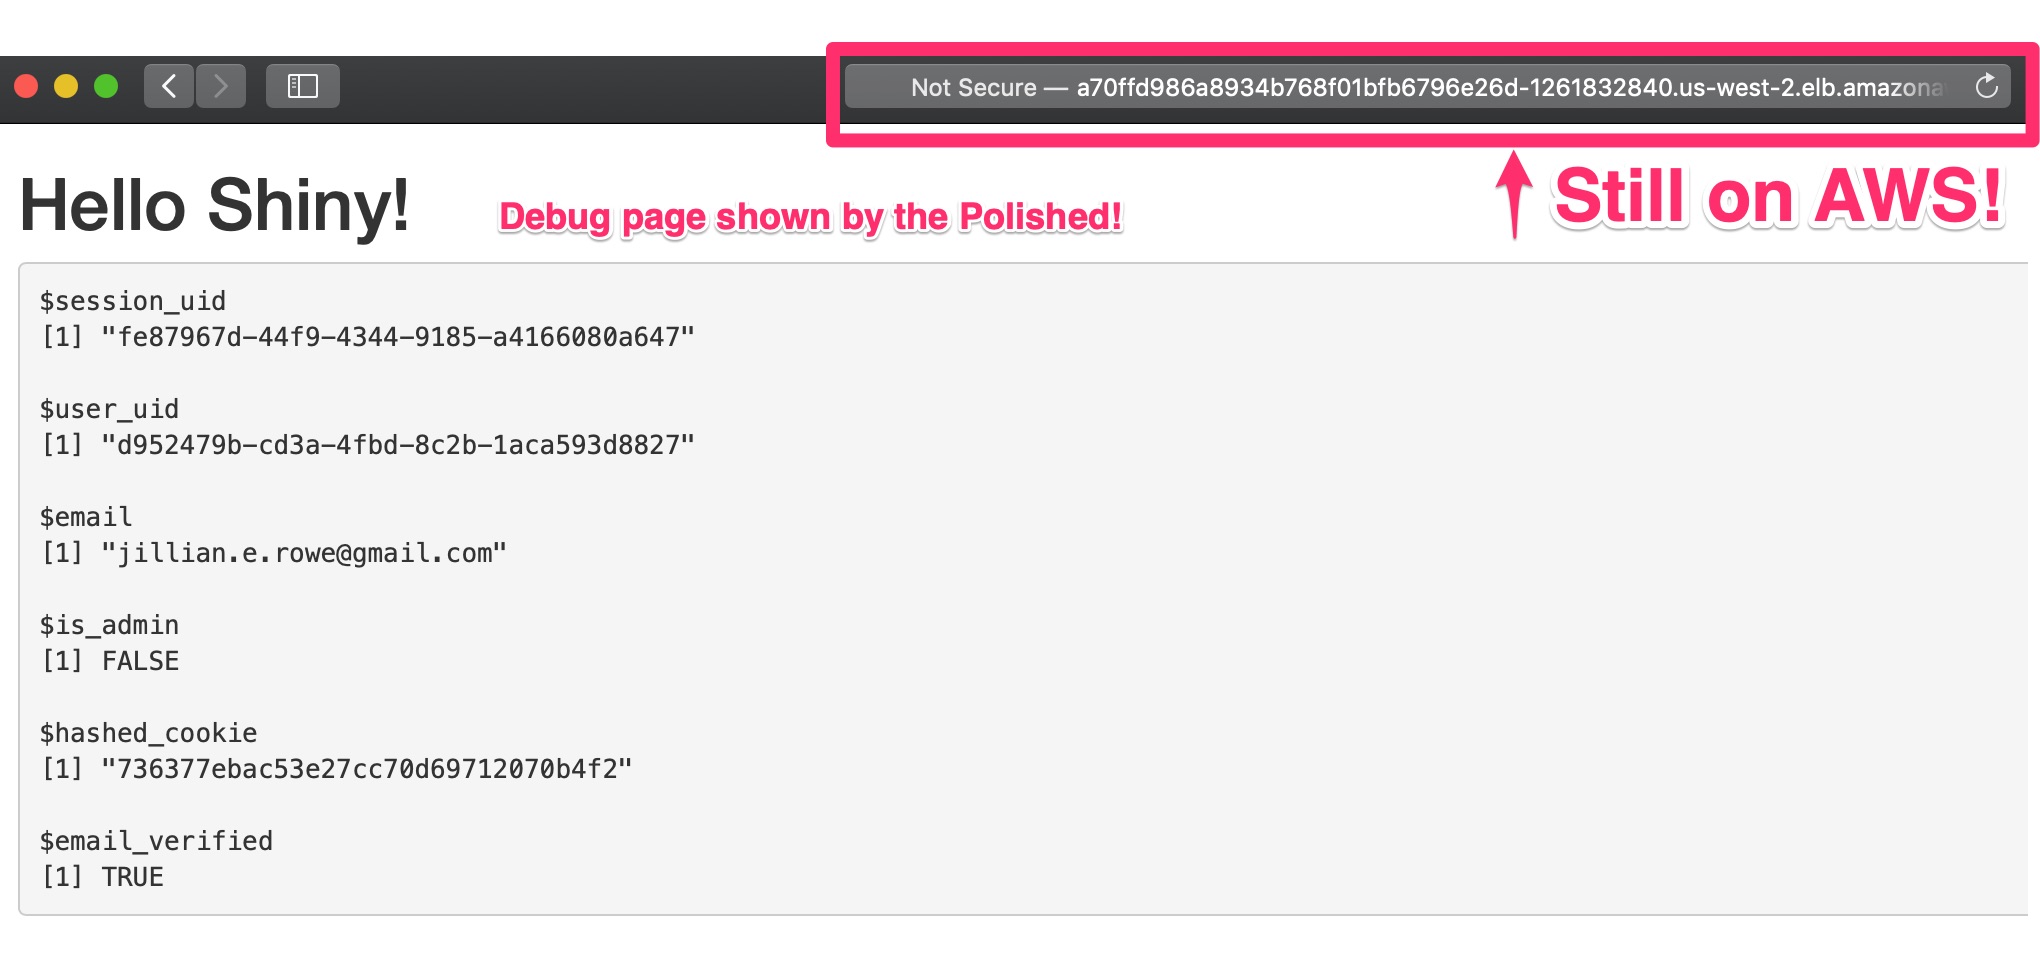
Then, when you login, you'll see the session data!
Helpful Commands
Here are some helpful commands for navigating your RShiny deployment on Kubernetes.
# Get a list of all running pods
kubectl get pods
# Describe the pod. This is very useful for troubleshooting!
kubectl describe pod PODNAME
# Drop into a shell in your pod. It's like docker run.
kubectl exec -it PODNAME bash
# Get the logs from stdout on your pod
kubectl logs PODNAME
# Get all the services and urls
kubectl get svc
A quick note about SSL
Getting into SSL is a bit beyond the scope of this tutorial, but here are two resources to get you started.
The first is a Digital Ocean tutorial on securing your application with the NGINX Ingress. I recommend giving this article a thorough read as this will give you a very good conceptual understanding of setting up https.
The second is an article by Bitnami. It is a very clear tutorial on using helm charts to get up and running with HTTPS, and I think it does an excellent job of walking you through the steps as simply as possible.
If you don't care about understanding the ins and outs of https with Kubernetes just go with the Bitnami tutorial. ;-)
Wrap Up
That's it! Hopefully you see how easy it is to get up and running with secure authentication using the polished.tech hosted service!
If you have any questions or comments please reach out to me directly at [email protected]. If you have any questions about the polished.tech authentication service check them out on their website.
Resources
Polished Tech RShiny Authentication

